Remember the 39,043-line file?
The one I showed you in the first article of this series. A single module of a Shiny application, a single file, 39,043 lines. The most catastrophic thing anyone has ever sent me.
In that first article, we talked about structure: how to split the application into modules, organize the R/ folder, and put every file in its place.
But today, I want to do something different.
I want us to open that file and look at the code.
Here’s an excerpt from the UI part:
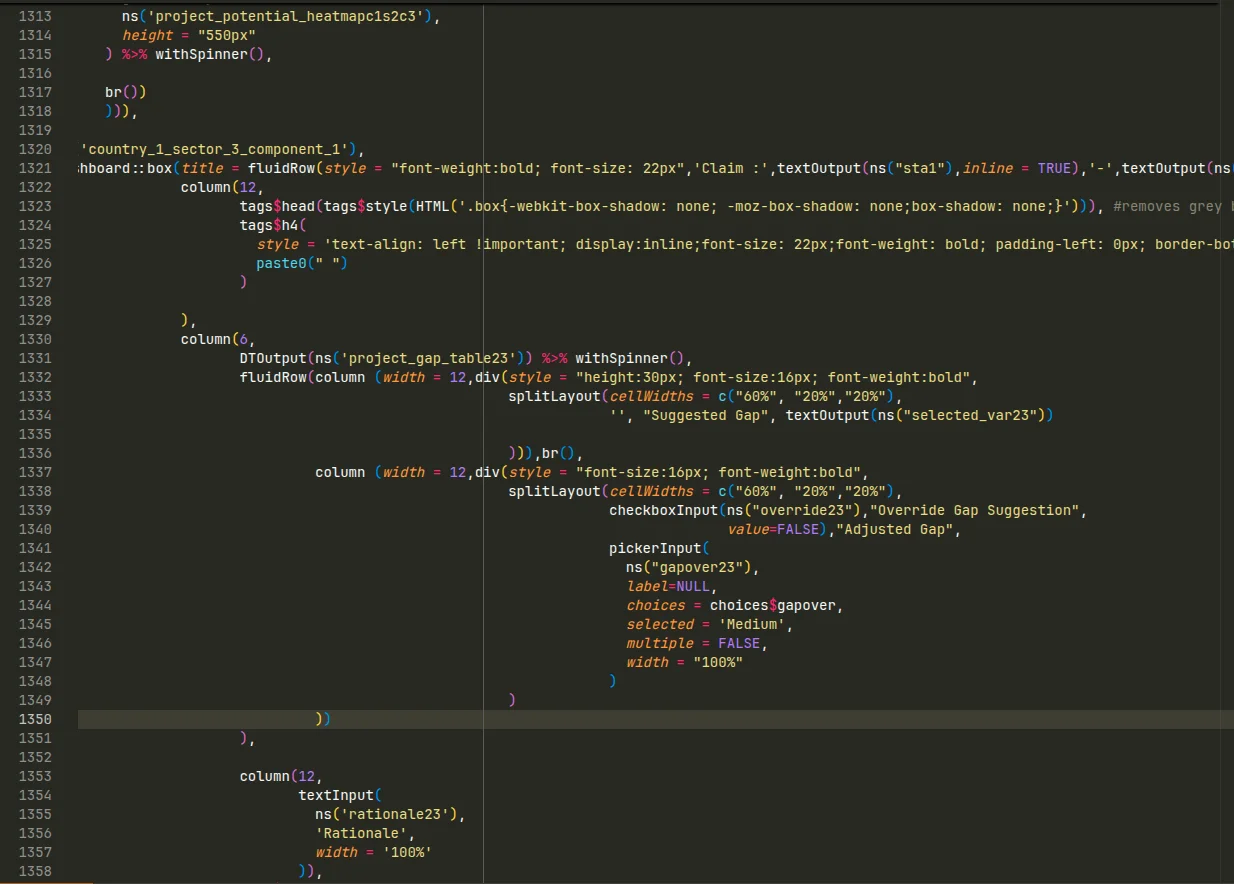
Two landmarks to read this screenshot:
- The vertical bar is the 80-character limit, a widespread convention to avoid horizontal scrolling. Line 1321 blows way past it: to read it in full, you have to scroll right.
- The indentation doesn’t follow the structure of the code. It’s hard to tell, at a glance, which block closes at line 1350.
Nothing exceptional here: this is the state of most codebases we inherit. Code written on the fly, by people whose job isn’t development, to meet a real need. It works, but it has become hard to read.
Working on this code is like being asked to take over a 50-page report, except it’s delivered as a plain text file. Zero formatting. No headings, no paragraphs, typos on every line. And the mission: “Add your expertise to the document.”
Impossible. Before adding any value at all, you first have to clean things up.
And that’s exactly what we do. Every time we take over a client codebase, the first step, before even thinking about any new feature, is the cleanup.
On this particular project, three symptoms stood out immediately:
1. Chaotic indentation. You saw it in the screenshot. When indentation no longer reflects the structure of the code, every read becomes a deciphering exercise. You can’t tell which block contains what, or where it ends.
2. Haphazard naming. My favorite example: the variable project_gap_table_prep. It existed in more than 60 variants in the file. project_gap_table_prep5, project_gap_table_prep23, project_gap_table_prep71, project_gap_table_prepc2s3, project_gap_table_prepc3s3c3…
254 occurrences in total. No apparent logic. Fun fact: I spent my first days on the project building a lookup table between variables, just to figure out who was who.
3. Massive duplication. Digging in, we eventually cracked the suffixes: c2s3 meant “component 2, sector 3”. In other words, the same code block was copy-pasted for every combination, with just the suffix changing. That’s the secret behind the 39,043 lines. It’s not a gigantic application. It’s a medium-sized application, duplicated dozens of times.
The most frustrating part? This application worked. It was running in production, users relied on it. The code “happened to work”.
But every change was an ordeal. Every bug, a treasure hunt. And the client knew it, which is exactly why he called us.
That’s the whole difference between code that works and code with quality. And that’s the topic of this third article in the series on Shiny development best practices.
On the agenda:
- Adopting code standards, so the code is consistent and readable
- Automating compliance with these standards using
lintrandstyler - The principles of clean code: naming, refactoring duplication, short functions
- Handling errors properly with
logger - And an introduction to testing, so the code stays robust over time
Let’s go.
1. Adopt code standards
Let’s start with a very simple question: why is the file from earlier so painful to read?
It’s not (only) a matter of skill. The developer who wrote it knew Shiny, the application worked. No, the real problem is inconsistency.
One line indented with 2 spaces, the next with 7. Sometimes arguments are named, sometimes not. Sometimes single quotes, sometimes double quotes. Sometimes camelCase, sometimes snake_case.
Each inconsistency, taken individually, is insignificant. But accumulated over thousands of lines, they create a constant background noise. Your brain spends its time decoding the form instead of understanding the substance.
It’s exactly the effect of typos in a report: each one breaks the flow. And by the tenth, doubt creeps in. If the author didn’t care about the form, did they care about the reasoning?
It’s the same for code. And the solution has a name: code standards.
A code standard is a set of rules, mostly arbitrary, that answer all these micro-questions once and for all. How many spaces for indentation? Which quotes? Which naming style?
The point is not for these rules to be the “best” ones. The point is for them to be applied everywhere, by everyone, all the time.
Because consistent code is code where your brain can run on autopilot for the form, and devote 100% of its attention to the substance.
Our own standards
Let me share the rules we apply at Data Champ’ on all our projects. You don’t have to adopt the same ones. But if you don’t have any standards yet, take these, they’ve proven themselves. They’re also very heavily inspired by the Tidyverse style guide.
Indentation: 4 spaces.
No tabs, no 2 spaces. Four. It’s more breathable, and it makes the block hierarchy immediately visible. That’s actually why we use the particular module syntax presented in the article on structure: to preserve these 4 spaces.
Line length: 80 characters as a target, 120 as a hard limit.
Remember the vertical bar in the screenshot?
Beyond 80 characters, you risk horizontal scrolling, which we absolutely want to avoid.
The ideal is max 80. In practice, we have some tolerance, but past 120 we outright block Merge Requests.
Naming: snake_case, descriptive, lowercase.
work_packages rather than wp. selected_country rather than sc1. And above all, no project_gap_table_prepc2s3c3: if you need a cryptic suffix to distinguish two variables, the problem lies elsewhere (we’ll come back to it in the section on duplication).
Assignment: <- for assignment, = for arguments.
production_year <- 2025

data <- some_function(
    argument_1 = 1,
    argument_2 = 2
)
Multi-line function calls: one argument per line, all named, closing parenthesis on its own line.
That’s the format you see just above. As soon as a call no longer fits comfortably on one line, we unfold it. The result: no more horizontal scrolling, and the closing parenthesis shows unambiguously where the block ends.
Quotes: double.
"like this", never 'like this'. Arbitrary? Completely. But applied everywhere.
The pipe: the native pipe |>.
Since R 4.1, R has its own pipe. No more need for %>% and its dependency on magrittr.
Packages: always prefixed with ::.
We write data.table::fread(), shinyWidgets::pickerInput(), DBI::dbGetQuery(). This way, the origin of every function is explicit, and we avoid name conflicts between packages.
The only exceptions: packages where the prefix really hurts readability, like ggplot2 (imagine prefixing every aes()…) or the special operators from data.table. Those are loaded via library() in the global.R, and that’s it.
Documentation: roxygen2 for all model, service and helpers functions.
#' Get all projects
#'
#' @param conn Database connection (pool or DBI connection).
#' @return `data.table` with all columns of the `project` table.
project_model_get_all <- function(conn) {
    data.table(DBI::dbGetQuery(
        conn = conn,
        statement = "SELECT * FROM project ORDER BY name"
    ))
}
A title, the parameters, what the function returns. No need for more. (And if the model, service and helpers families don’t ring a bell, everything is explained in the article on structure.)
That’s the gist of it. You’ll notice that none of these rules is complicated. The challenge isn’t understanding them.
The challenge is applying them. Everywhere. All the time. Even on a Friday at 6pm when you just want to finish your feature.
And here, I have good news for you.
2. Automate compliance with lintr and styler
Let’s go back to the report analogy.
When you write it in Word, the software doesn’t fix the typos for you. It underlines the typos, the awkward phrasing, the inconsistencies. Then it’s up to you to fix them.
For R code, this typo detector exists. It’s called lintr.
lintr: enforcing the rules
lintr scans your code and lists every rule violation: inconsistent indentation, lines that are too long, badly named variables, dead code, bad practices.
To analyze an entire project:
lintr::lint_dir()And you get the full list of problems, file by file, line by line, directly clickable in RStudio or VSCode.
Configuration goes through a .lintr file at the root of the project. You might remember this file: it appeared in the project structure from the first article, with a promise to come back to it. Here we are.
Here’s ours, identical on all our projects:
linters: linters_with_defaults(
    line_length_linter(120),
    object_usage_linter = NULL,
    brace_linter = NULL,
    object_length_linter(50),
    trailing_whitespace_linter = NULL,
    indentation_linter(4))
encoding: "UTF-8"
The principle: we start from the default rules with linters_with_defaults() (which already include snake_case, spaces after commas, etc.), then adjust. You can see the standards from the previous section in there: 120 characters as a hard limit, 4-space indentation. And we disable a few linters that, on our projects, generate more noise than value, like object_usage_linter and its flood of false positives in a Shiny application.
Plugging lintr into CI: the ultimate safeguard
Running lintr by hand is fine. But we’re back to the Friday 6pm problem: the day you’re in a hurry, you forget.
The solution is to make the check mandatory and automatic: integrate lintr into the project’s CI/CD pipeline. On every push, the pipeline runs the linter, and if the code doesn’t follow the standards, the pipeline fails. Impossible to merge.
It might sound brutal. In practice, it’s liberating:
- No more playing code-style police during code reviews. The machine handles it, without qualms and without ruffling anyone’s feathers.
- The standard is guaranteed on 100% of merged code. Not “most of the time”. Always.
- And a new developer joining the project discovers the rules immediately, on their very first push.
I won’t detail the pipeline setup itself here, it deserves an article of its own. Keep the idea: compliance with standards should not rest on human discipline, but on an automatic check.
styler: to make your life easier
lintr flags the problems, but doesn’t fix them. For automatic fixing, there’s a second tool: styler.
styler takes your code and reformats it according to a given style: indentation, spaces around operators, brace placement, etc.
On one file:
styler::style_file("R/100_home_server.R")On an entire folder:
styler::style_dir("R/")And that’s it. The chaotic indentation, the missing spaces after commas, the misplaced braces: everything is fixed in one go. And styler only changes the form of the code, never its behavior: zero risk of breaking anything.
To be honest with you: in daily work, I almost never use styler.
Not because the tool is bad. But because by applying the standards over and over, they’ve become reflexes. I no longer write a badly indented line, just like you no longer make basic grammar mistakes. That’s the real destination: the rules end up writing themselves.
Where styler truly shines is when taking over a messy codebase. Faced with a file like the one at the start of this article, a styler::style_dir() saves hours of manual reformatting.
One piece of advice if you do it: run styler in a dedicated commit, containing nothing else. Otherwise, the day you search the Git history for the origin of a change, the massive reformatting will pollute everything.
With written standards and lintr plugged into CI, you’ve solved the question of form. Permanently.
But neither lintr nor styler will rename your cryptic variables, and no tool will deduplicate your code for you. Code can be perfectly formatted and remain a nightmare: 60 variants of project_gap_table_prep nicely indented in snake_case are still 60 variants of project_gap_table_prep.
Time to talk about substance: clean code.
3. Write clean code
Let’s go back to our three symptoms from the beginning:
- The chaotic indentation? Solved. That’s exactly what the standards and
lintrjust eliminated. - The haphazard naming? Still there.
- The massive duplication? Still there too.
And for these two, no automated tool will come to your rescue. Renaming a variable, factoring out duplicated code: these are decisions that require understanding what the code does.
This is what we call clean code: beyond the form, writing code whose very logic is crystal clear.
The topic fills entire books (Clean Code, to name only the most famous). I’ll focus on the three principles that transform our Shiny projects the most.
Names that tell what the code does
We read code far more often than we write it. You write a variable once, you’ll reread it dozens of times, sometimes years later, sometimes with no memory of the context.
The name of a variable or function is therefore the most-read documentation in your project. It might as well work for you:
- A variable says what it contains:
selected_country,monthly_revenue,projects_with_gaps. - A function starts with a verb or follows a clear convention:
format_currency(),client_model_get_all().
The test is simple: if you have to open the function to understand what it does, the name has failed.
Now, look at project_gap_table_prep23.
What does this variable contain? How is it different from project_gap_table_prep71? No way to know without tracing through all the code. That’s exactly what cost me my first days on the project, reconstructing that famous lookup table.
But the most interesting part is that this naming is a symptom. If you need a numeric suffix to distinguish 60 versions of the same variable, the problem isn’t the name.
The problem is that there are 60 versions of the same variable.
Don’t repeat yourself
This is the DRY principle: Don’t Repeat Yourself.
Remember the suffixes from the 39,043-line file: c2s3 for “component 2, sector 3”. The same code block, copy-pasted for every combination, with just the suffix changing.
Why is this serious? Do the math with me.
You find a bug in the gap table. You fix it. Except this code exists in 60 copies. You’ve just fixed 1 bug out of 60. The 59 others are sitting quietly in production.
And every change follows the same rule: any modification must be replicated 60 times, by hand, without missing a single one. It’s untenable.
The solution, you already know it if you’ve read the article on structure: factoring out. A function if it’s logic, a Shiny module if it’s a UI block with its reactive logic.
Instead of 60 copies:
output$project_gap_table23 <- DT::renderDataTable({
    # 50 lines of preparation for project_gap_table_prep23
})
output$project_gap_tablec2s3 <- DT::renderDataTable({
    # the same 50 lines, for project_gap_table_prepc2s3
})
# ... repeated for every combination
A single module, called with parameters:
gap_module_ui(ns("gap"), data = data)The block now exists in one single place. A bug? One fix. A change? One modification. And the project_gap_table_prep23 variables disappear on their own: inside the module, the variable is simply called project_gap_table.
One small nuance before you go off refactoring your entire application: occasional duplication is not a crime. Copy-pasting a block once happens, and it’s sometimes more readable than a premature abstraction. My practical rule: at the third copy, factor it out.
Short functions, a single responsibility
Last principle, and it’s the direct extension of the Separation of Concerns covered in the first article: a function should do one thing only.
How do you know if that’s the case? Once again, naming holds up a mirror. If you can name your function simply (format_currency, compute_gap_score), that’s a good sign. If the honest name would be load_and_filter_and_compute_and_plot, you have four functions disguised as one.
The benefits of short, single-responsibility functions:
- They’re easy to understand: everything fits on one screen, no scrolling needed to follow the logic.
- They’re easy to reuse: a function that does one thing fits everywhere. A function that does four fits nowhere.
- They’re easy to test: we’ll come back to this in the section on testing.
And where do you put all these functions? That’s exactly the role of the helpers, model and service families presented in the article on structure. The model/service separation in particular is the single responsibility principle applied at project scale: data access on one side, business logic on the other.
The result: before / after
So, what does all this look like, applied to the 39,043-line file?
Here’s roughly the same piece of code as the screenshot from the beginning, after cleanup:
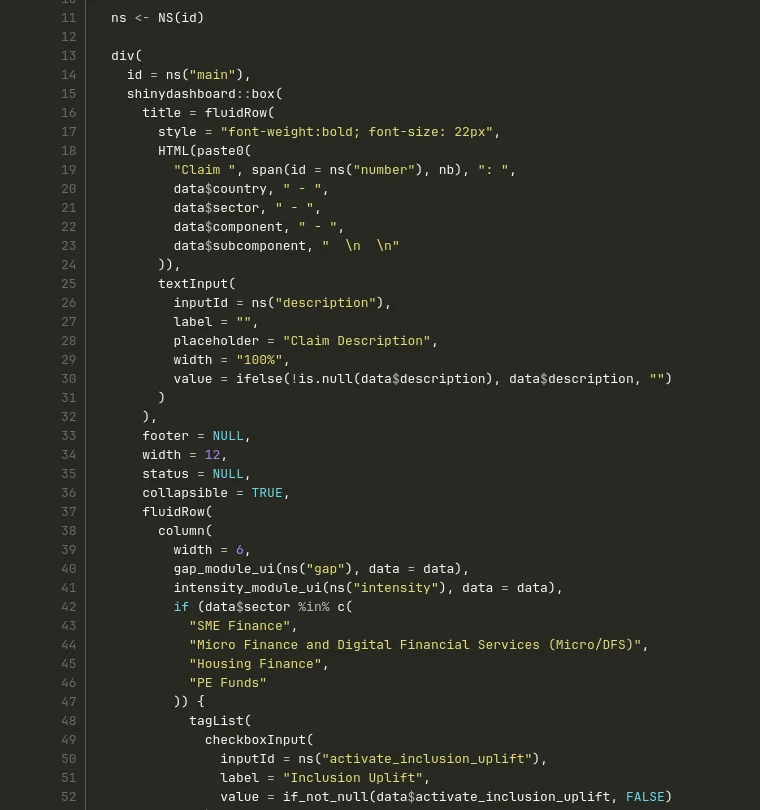
Compare it with the screenshot from the start. It’s clearer, more breathable, readable top to bottom without horizontal scrolling. The indentation tells the structure. And you can see factoring at work: the calls to gap_module_ui() and intensity_module_ui() replace entire blocks that used to be copy-pasted.
“But it takes more lines!”
Locally, that’s true: unfolded code, one argument per line, takes up space. But at project scale, the verdict is unambiguous:
- Before: 39,043 lines, in a single file.
- After: around 15,000 lines, spread across about thirty files.
Three times less code, for exactly the same features. That’s the effect of factoring out duplication. And each file, taken individually, reads like a chapter: a clear title, one responsibility, a reasonable length.
The 50-page plain-text report has become a structured document, with a table of contents, chapters, and zero typos. We can finally add our expertise to it.
The code is clean and readable. But clean doesn’t mean infallible: we still have to handle what happens when things go wrong.
4. Handle errors properly
An application in production lives. And sometimes, it breaks: the database stops responding, an external API returns garbage, a user uploads an unexpected file.
The question isn’t if an error will happen, but when. And above all: what happens at that moment?
In a Shiny application with no error handling, the answer is brutal: the screen turns gray. The session crashes, the user loses their work in progress, and you have no trace of what happened. You’ll learn about it from a client email: “The app doesn’t work anymore.”
Quality code is also code that fails gracefully: the user is informed with a clear message, and you keep an actionable trace for diagnosis. Two tools for that.
logger: actionable traces
First reflex to abandon: the print() and cat() calls scattered through the code to “see what’s going on”.
Instead, we use the logger package. Same writing effort, but with three decisive advantages:
- Every message is timestamped automatically.
- Every message has a level:
INFOfor normal operations,WARNfor recoverable failures,ERRORfor blocking failures,DEBUGfor development traces. - You can filter by level:
DEBUGtraces show up in development, but disappear in production, without touching the code.
logger::log_info("Loading projects: {nrow(projects)} rows")
logger::log_warn("Weather API unavailable, displaying without forecasts")
logger::log_error("Database write failed: {e$message}")
(Yes, logger natively supports glue-style interpolation: the {} are evaluated inside the message.)
On our projects, every significant block of a module starts with a log line following a systematic format, "{number} - {module} - {block}":
logger::log_info("521 - projects - save")The result: when something goes wrong in production, the logs tell the story. Which module, which block, in what order, and what error message. The diagnosis that used to take an afternoon takes ten minutes.
tryCatch + a centralized handler
Second tool: intercepting errors where they can occur, with tryCatch.
The classic mistake is rewriting the handling by hand in every tryCatch: sometimes you log, sometimes you show a notification, sometimes you forget half of it. A consistency problem, once again.
Our solution: a centralized handler, defined once in the helpers:
handle_shiny_error <- function(context) {
    function(e) {
        logger::log_error("{context}: {e$message}")
        showNotification(
            paste("Error:", e$message),
            type = "error",
            duration = 10
        )
    }
}
And in use, every risky operation (database write, API call) is wrapped like this:
observeEvent(input$save, {
    tryCatch({
        project_model_update(conn = conn, project = project)
        projects_refresh(projects_refresh() + 1L)
        removeModal()
        showNotification("Project saved.", type = "message")
    }, error = handle_shiny_error("521/save_project"))
})
If the database write fails, no more gray screen: the user sees a clear error notification, the application keeps running, and the log contains the exact context (521/save_project) along with the error message.
One last trap to avoid: the tryCatch that swallows errors silently, like error = function(e) NULL. That’s worse than no handling at all. The application seems to work, but the data isn’t saved, and nobody knows. An error must always leave a trace.
5. Write tests
Last pillar of quality, and I can hear you already: “Tests? For a Shiny application? We don’t have time.”
Let me tell you why we write them anyway.
Remember the factoring from section 3: 60 copies of a block merged into a single module. A question should have crossed your mind: how do we know we didn’t break anything?
Manually checking all 60 combinations, in every possible configuration, after every change? Nobody does that. And that’s exactly how regressions make it to production.
The solution is to write code that checks the code: automated tests. You write them once, you rerun them at will, and every refactoring becomes a calm operation: if the tests still pass, the behavior is preserved.
What it looks like
In R, the reference package is testthat. Here’s a test for a helpers function:
describe("format_currency", {
    it("should format a number with thousands separator and euro symbol", {
        expect_equal(format_currency(1234.5), "1 234,50 €")
    })
    it("should return an empty string when the input is NA", {
        expect_equal(format_currency(NA), "")
    })
})
The structure reads itself: one describe per function, one it per expected behavior. We check the normal case, and above all the edge cases (the NA that will inevitably show up eventually).
And now you see why I insisted on short, single-responsibility functions: a function that does one thing can be tested in three lines. A 400-line function that loads, filters, computes and displays is a nightmare to test. Code quality and testability are the same battle.
What to test (and what not to test)
The beginner’s trap is trying to test everything, burning out, and giving up. Not all tests are equal. Before writing a test, I ask myself three questions:
- What concrete bug would this test catch?
- Would it survive a refactoring that doesn’t change the behavior? (If not, it tests the implementation rather than the behavior, and it will hinder you more than protect you.)
- Would it break if I introduced a logic error? (If not, it protects nothing.)
In practice, on our Shiny projects, most of the tests cover the model functions (data access, tested against a real test database) and the service functions (business logic, where the computations and therefore the bugs live). The UI itself, we test very little: it’s expensive, fragile, and bugs are rarer there.
Where to start: the reactive strategy
Which leaves the real question: how do you actually get started?
Because let’s be honest about the starting point. Most Shiny applications start as prototypes: a single developer, who has the whole application in their head, and tests it by hand in thirty seconds. At that stage, automated tests wouldn’t bring much. Zero tests is the normal starting point, not a fault.
The problem comes later, when the prototype has grown, memory is no longer enough, and there you are facing thousands of lines without a single test. The idea of catching up all at once is paralyzing. So you do nothing.
Here’s the trick to get started painlessly: adopt a reactive strategy. Don’t try to cover the existing code. Wait for the next bug.
When a bug appears:
- You make sure the relevant code is clean. If the faulty logic is buried in a big block, you first factor it out into a function (and you know how, that was section 3).
- You write one or more tests that reproduce the bug. They fail, and that’s normal: it’s the proof that they actually detect the problem.
- You fix the bug. The tests turn green.
Cost: a few minutes more than the fix alone. Benefit: that particular bug will never come back. Because there’s nothing more frustrating than fixing the same bug for the third time, six months after the first two.
And the compounding effect is formidable. Every bug enriches the test suite, exactly where the code needs it most: the fragile areas are, by definition, where bugs appear. Over the months, without ever blocking a week to “write the tests”, you end up with an application that gets more and more robust.
I’ll stop here for today. Testing deserves much more than two subsections: the infrastructure, integration tests with a database, mocks, the full strategy. That will be the subject of a dedicated article in the coming months.
Remember the key takeaway: tests are not a luxury for big teams. They’re what allows you to change your code without fear.
Conclusion
Let’s retrace the journey from the 39,043-line file:
- Code standards eliminated the formal inconsistencies: indentation, naming, formatting. The background noise is gone.
lintrand CI made these standards automatic and guaranteed, without relying on anyone’s discipline.- The principles of clean code (descriptive naming, factoring out duplication, single responsibility) divided the size of the code by three.
loggerand centralized error handlers made the application diagnosable: no more mysterious gray screens.- And tests lock it all in: the code can evolve without fear of regression.
The unreadable 50-page report has become a structured, proofread document. And above all, it will stay that way: that’s the whole difference between a one-off cleanup and a quality system.
That’s the real lesson of this article. Code quality is not a big cleanup you do once. It’s a set of simple rules, backed by tools and automation, applied to every line written. At first, it takes conscious effort. After a few months, it’s a reflex.
This article is the third in a series of six articles to go from a Shiny prototype to an industrialized application:
- Structure the project
- Ensure reproducibility with
renv - Ensure code quality (the article you just read)
- Refine the software design (coming soon)
- Deploy the application on a VM
- Secure the application with Auth0
See you in the next article to talk about software design.
Comments