Last Thursday, I set myself a little personal challenge.
The day before, we had decided to add a key feature to a project: the ability to save and resume conversations in a chatbot built with ellmer.
The catch? We had a client meeting at 10am to show progress.
No big deal if it wasn’t ready, but it’s always nice to say, “Yep, it’s done”.
So I put on some music, dove into the code, and got to work.
I had already spotted a fresh Merge Request in the package that did more or less what I needed.
I installed it, tweaked a few things, tested… and it worked.
So I committed, pushed, the CI pipeline passed, and I went into the meeting, feeling pretty pleased with myself.
The call went fine, I hit the gym, and came back in the afternoon, ready to keep going.
Until… this message from Léo on Mattermost:
WHAT DO YOU MEAN IT DOESN’T WORK?
Checked on my machine: everything’s fine.
“It works on my machine”, I told him.
“Yeah, but not on mine.”
I started to get annoyed, nearly flipped my desk (╯°□°)╯︵ ┻━┻, and then it hit me:
We weren’t using the same version of the ellmer package.
Classic rookie mistake: I had forgotten to update the renv.lock file in my rush.
Result: works for me, fails for Léo.
Sounds familiar? Ever happened to you? Not using renv yet?
Or maybe you’ve installed it but have no idea what it’s for, or how to use it day-to-day?
That’s exactly what this article is about. Here’s what we’ll cover:
- Why
renvis essential for any serious R project (and not just for teams) - How it actually works
- How to fix every annoying problem you might run into
Let’s get started.
What’s the point of renv?
Same package versions everywhere
This is the basics.
renv guarantees that everyone works with exactly the same package versions: you, your teammates, the production server, the test machine… everyone.
What does that mean in practice?
- No more “it works on my machine” (but not one someone else’s)
- Onboarding a new teammate? They just clone the repo, run
renv::restore(), and that’s it. Their environment matches yours, no hassle. - Deploying to production? Same deal: the code will run exactly as it does locally.
- Revisiting old code six months or six years later? You start from the exact same environment as back then.
Bottom line: you eliminate all those invisible bugs that waste hours and are just due to package version mismatches.
Different projects, different environments
By default, all R projects on a machine share the same set of packages.
That’s convenient… until it isn’t. Update a package for one project, and suddenly another project breaks.
At Data Champ’, we juggle dozens of projects all year long. Retesting every app after every package update is not an option.
With renv, every project gets its own isolated environment:
- You can work on an old project running R 3.6.3 and very old packages, while using the latest versions elsewhere.
- No more project conflicts. You don’t always get to use the latest R and packages for everything.
- For any project, just clone, restore the environment, and you know it’ll work as expected.
This isn’t just for teams. It’s a productivity tool that makes life easier for anyone using R.
And the best part? It’s dead simple to use.
How do you use renv ?
There are only three verbs you need to know. That’s it.
Initialize renv with renv::init()
Whenever I get sent a new project, this is the very first thing I do.
If the project is an R package, renv will suggest using the DESCRIPTION file to install dependencies.
> renv::init()
This project contains a DESCRIPTION file.
Which files should renv use for dependency discovery in this project?

1: Use only the DESCRIPTION file. (explicit mode)
2: Use all files in this project. (implicit mode)

Selection:
We rarely use a package structure for our Shiny apps, and there’s no guarantee
Option 2 scans all files in the project and automatically detects every package you use:
- When you call
library(package) - Or use
package::function_name()
Packages are then downloaded and installed automatically. You don’t have to do anything else.
You’ll see a success message like this:
The version of R recorded in the lockfile will be updated:
- R                    [* -> 4.4.3]

- Lockfile written to "~/path/renv.lock".
- renv activated -- please restart the R session.
Two things are important here:
renvrecords the version of R you’re using (e.g., 4.4.3)- It tells you to restart your R session. This is required after activating
renv.
When initializing, renv adds a few things to your project:
- The
renv.lockfile: It lists every package and version your code needs. - A line in
.Rprofile(created if it doesn’t exist yet) to auto-activaterenvat session start. - The
renvfolder, which holds technical files and installed packages. It also includes a.gitignoreto exclude what shouldn’t be tracked.
You don’t need to add the renv folder to your .gitignore yourself. It’s all handled for you.
All you have to do is run renv::init(). That’s it.
Save new packages with renv::snapshot()
As you develop, you will add or remove package dependencies. Or maybe you will update a few packages.
To make sure these changes are recorded, use renv::snapshot().
renv will show you what’s about to change:
- Packages added
- Packages with version changes
- Packages removed
> renv::snapshot()
The following package(s) will be updated in the lockfile:

# CRAN -----------------------------------------------------------------------
- anytime           [0.3.9 -> *]
- BH                [1.81.0-1 -> *]
- bookdown          [0.36 -> 0.43]
- brio              [1.1.3 -> 1.1.5]
...
- xfun              [0.41 -> 0.52]
- XML               [3.99-0.15 -> 3.99-0.18]
- zip               [2.3.0 -> 2.3.3]
- textshaping       [* -> 1.0.1]

Do you want to proceed? [Y/n]:
Once you confirm, the renv.lock file is updated. Commit it so your teammates get the changes.
This is exactly the step I skipped in my story at the start of the article.
So, how do your teammates install the right packages?
Restore the environment with renv::restore()
When you open a project that uses renv, it auto-activates as soon as your R session starts:
# Bootstrapping renv 1.1.4 ---------------------------------------------------
- Downloading renv ... OK
- Installing renv  ... OK

ℹ Using R 4.4.3 (lockfile was generated with R 4.1.2)
- Project '~/path' loaded. [renv 1.1.4]
- One or more packages recorded in the lockfile are not installed.
- Use `renv::status()` for more details.
R version 4.4.3 (2025-02-28) -- "Trophy Case"
Platform: x86_64-pc-linux-gnu (64-bit)
A few things to note:
- It auto-installs
renv(here, version 1.1.4). Good. - It teels you you’re using R 4.4.3, but the lockfile was made with R 4.1.2. That’s a problem: you don’t have the right R version.
- Some packages in the lockfile aren’t installed yet. That’s normal, since you just opened the project.
- It suggests running
renv::status()for more info.
Switch to the correct R version, then run renv::status() :
> renv::status()
The following package(s) are in an inconsistent state:

 package         installed recorded used
 anytime         n         y        ?
 AsioHeaders     n         y        ?
 askpass         n         y        ?
 backports       n         y        ?
 ...
 xtable          n         y        ?
 yaml            n         y        ?
 zip             n         y        ?
 zoo             n         y        ?

See `?renv::status` for advice on resolving these issues.
renv::status() lists “problem” packages with three columns:
- Is the package installed?
- Is it saved in the lockfile?
- Is it used in the project?
In this case, you’re restoring a project. So all packages are in the lockfile, but not installed.
To install them, simply run renv::restore().
Update all packages with renv::update()
One last tip. If you read our article “Which version of R should you use in production?”, you know it’s smart to update packages regularly, say, once a year or every two years.
It’s easy: just run renv::update().
That’s it.
Documentation
This article only covers the basics of renv (and honestly, that’s 99% of what you’ll ever need).
If you want to dig deeper, check out the docs: Introduction to renv
Problems and solutions
renv is a fantastic tool.
But let’s be real: dependency management is a fucking nightmare.
Beyond the three basic commands for daily use, you will sometimes run into weird or complex situations.
That’s why I have added this section, with every problem I have personally encountered, and I will keep updating it as new issues pop up.
If you hit a problem that is not covered here, drop it in the commints at the end.
I installed a package but renv doesn’t add it to renv.lock
You did:
install.packages("packagename")- Then:
renv::snapshot()
But renv doesn’t offer to add packagename to the lockfile.
That’s normal: renv only records packages actually used in your code.
So if you install microbenchmark just to optimize your code, it won’t be added.
This is a good thing: no need to clutter your colleagues’ or production environments with unused packages.
But if you really want to force renv to include it, do this:
if (FALSE) library(microbenchmark) # Necessary to add in renv.lockJust having library(microbenchmark) in your code is enough for renv to pick it up.
But the package never actually loads. You save those precious milliseconds at startup.
And the comment helps your teammates understand why that line exists (so they don’t delete it).
Packages used in R Markdown files are not detected
This happens if the yaml package isn’t installed. You might see a warning like:
Warning message:
The 'yaml' package is required to parse dependencies within R Markdown files
Consider installing it with `install.packages("yaml")`.
Just install the yaml package.
Error: package ‘name’ is not available
This usually popup up during renv::init(). Your code uses packages that renv can’t find on CRAN.
For example, I ran into this with the polars package, which is available from R-universe, not CRAN:
The following package(s) were not installed successfully:
- [polars]: package 'polars' is not available
In this case, install the package from its actual source (usually Github or another repository, not CRAN).
Warning: renv took longer than expected to activate the sandbox
One morning, you open up your project like you always do. But today, for some reason… R takes forever to start.
After what feels like an eternity, you finally see this warning pop up:
Warning message:
renv took longer than expected (37 seconds) to activate the sandbox.

The sandbox can be disabled by setting:

    RENV_CONFIG_SANDBOX_ENABLED = FALSE

within an appropriate start-up .Renviron file.
You probably have a few questions…
What even is the sandbox?
The whole point of the sandbox is to make sure you don’t accidentally use the wrong version of a package.
You might know that when R loads a package, it doesn’t just look in one folder. It checks a list of directories, in order, and grabs the first match it finds.
You can see this for yourself by running .libPaths() in your console. Here’s what I get on my system:
> .libPaths()
[1] "/home/charles/repos/myproject/renv/library/linux-ubuntu-noble/R-4.4/x86_64-pc-linux-gnu"
[2] "/home/charles/.cache/R/renv/sandbox/linux-ubuntu-noble/R-4.4/x86_64-pc-linux-gnu/17ee7825"
The first line is my project folder, where renv is active and packages are stored locally.
The second line? That’s the sandbox. This is the default behavior with renv.
Now, let’s see what happens if I disable the renv sandbox. Here’s the output:
> .libPaths()
[1] "/home/charles/repos/myproject/renv/library/linux-ubuntu-noble/R-4.4/x86_64-pc-linux-gnu"
[2] "/opt/R/4.4.3/lib/R/library"
The first line is still my project’s library. But the second one? That’s now pointing straight to the system-wide R installation.
Why does this matter? Imagine this scenario: your project needs dplyr version 1.2.3, but…
- You haven’t run
renv::restore()yet, so it’s not installed in your project library. - You do have
dplyrinstalled globally, but it’s version 0.9.8.
When R goes looking for dplyr, it checks the first folder (nothing there), then the second. It finds the global version (the wrong version) and loads that instead.
Result? You get weird, unpredictable bugs, and you have no idea why.
The fix is simple: run renv::restore().
But here’s the thing: renv already tries to protect you from this mess with the sandbox. The sandbox replaces your system library with a “safe” folder that only contains the base R packages (stuff like base, stats, utils, class, and so on). There’s no way dplyr sneaks in there by accident.
So why does this warning happen?
I honestly have no idea.
Sometimes it just happens. Not every time. Sometimes I restart R and the warning disappears. I haven’t spent hours digging through the internals of renv to figure it out, so I’m just as clueless as you.
How do you fix it?
Personnally, I think the sandbox causes more headaches than it solves. If you forget to run renv::restore(), you’ll get a clear “The project is out-of-sync” message when you start your session anyway.
So, as suggested in the warning, I added RENV_CONFIG_SANDBOX_ENABLED=FALSE to my system-wide .Renviron file, and I haven’t seen this problem since.
This is especially important to add in your Dockerfile, by the way, since the sandbox can seriously slow down container startup.
Error in dyn.load(): unable to load shared object
I think this is the error that’s driven me the most insane in recent years. Seriously, I’ve spent AGES trying to figure out where it came from, why it happened, and, most importantly, how to fix it.
I’m writing this as it just happened to me minutes ago: I’m running renv::restore() on the production server. Everything worked fine locally, in development, but the production server is a little bit diferent. And I get this:
Error in dyn.load(file, DLLpath = DLLpath, ...) :
  unable to load shared object '/home/charles/myproject/renv/staging/1/RcppArmadillo/libs/RcppArmadillo.so':
  liblapack.so.3: cannot open shared object file: No such file or directory
Calls: loadNamespace -> library.dynam -> dyn.load
Execution halted

Error: error testing if 'RcppArmadillo' can be loaded [error code 1]
You need to know that since version 1.0.0, renv uses the Posit Public Package Manager (P3M) by default.

The P3M can be super handy: CRAN only provides binary package versions for Windows, and only for the latest version of each package.
So if you’re on Linux (like for a production server), or even on Windows but need an older package version (which will definitely happen if you use renv), you’ll have to compile packages from source.
Not a big deal… if you have time to spare.
But it quickly becomes a pain when you’re working with Docker images, or reinstalling packages in every CI/CD pipeline, or just want things to work smoothly.
P3M solves this by providing binaries for everyone: whatever package version you need, whatever Linux distribution you’re on.
BUT…
It’s not always that simple.
Remember that cryptic error message from earlier?
It’s a direct result of this behavior: I downloaded the binary from P3M, but… the package won’t load because I’m missing a system dependency, liblapack.so.3.
If I had tried to install the package the old-fashioned way (by compiling from source), I would have gotten a much clearer error, something like:
--------------------------------------------------------------------------------
  Configuration failed because libudunits2.so was not found. Try installing:
    * deb: libudunits2-dev (Debian, Ubuntu, ...)
    * rpm: udunits2-devel (Fedora, EPEL, ...)
    * brew: udunits (OSX)
  If udunits2 is already installed in a non-standard location, use:
    --configure-args='--with-udunits2-lib=/usr/local/lib'
  if the library was not found, and/or:
    --configure-args='--with-udunits2-include=/usr/include/udunits2'
  if the header was not found, replacing paths with appropriate values.
  You can alternatively set UDUNITS2_INCLUDE and UDUNITS2_LIBS manually.
--------------------------------------------------------------------------------
Here you can clearly see which system dependency you need to install.
But with the earlier error, you’re left in the dark. The installation actually worked, the binary file was downloaded and put in the right place, but loading the package fails because R can’t find a required system library.
Now you’re left guessing which system dependency is missing.
Most of the time, here’s what you should do:
- Go to the Posit Public Package Manager
- Click on SETUP
- Choose your OS, and your Linux distribution if you’re on Linux
- Search for the package name at the top
- Scroll down to Install system prerequisites
Here’s an example for the sf package, which is used for spatial data and needs a bunch of dependencies:
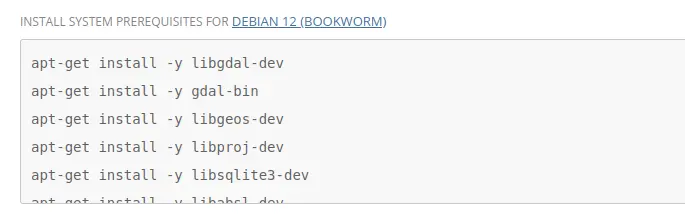
Just install the required dependencies, and you’re good to go.
Let’s go back to our error message:
Error in dyn.load(file, DLLpath = DLLpath, ...) :
  unable to load shared object '/home/charles/myproject/renv/staging/1/RcppArmadillo/libs/RcppArmadillo.so':
  /lib64/libm.so.6: version `GLIBC_2.29' not found (required by /home/charles/myproject/renv/staging/1/RcppArmadillo/libs/RcppArmadillo.so)
Calls: loadNamespace -> library.dynam -> dyn.load
Execution halted

Error: error testing if 'RcppArmadillo' can be loaded [error code 1]
The message tells me that glibc is missing. So I check and try to install the dependency:
[charles@RH8 myproject]$ sudo yum install glibc
Failed to set locale, defaulting to C.UTF-8
Updating Subscription Management repositories.
Red Hat CodeReady Linux Builder for RHEL 8 x86_64 (RPMs)    65 kB/s | 4.5 kB     00:00
Package glibc-2.28-251.el8_10.25.x86_64 is already installed.
Dependencies resolved.
Nothing to do.
Complete!
Ouch.
The dependency is ALREADY installed, but RHEL 8 (the Linux distribution I’m using for this project) only provides version 2.28 by default, while the binary from P3M was built with version 2.29.
In this case, you have only two options:
- Try to force RHEL to install version 2.29. But… other packages might need yet another version. You’re stuck.
- Or, compile the package from source.
The only real solution is the second one.
So, how do you do that?
You need to install the package from a CRAN mirror, like https://cloud.r-project.org.
Check the version recorded in your renv.lock, then use the following command:
renv::install("[email protected]", repos = "https://cloud.r-project.org")Don’t use install.packages(), since it will always install the latest version.
And don’t use renv::restore(repos = "https://cloud.r-project.org"), because renv will ignore your argument and still use the P3M.
Honestly, all these headaches make me think that forcing the P3M the by default was a bad call from the renv developers.
The original goal of renv is not to speed up package installation. The goal is reproducibility, and we’re clearly losing that thanks to this decision.
Sure, 95% of the time it will work fine, but the remaining 5% are a nightmare that make teams reluctant to even adopt the package.
Luckily, you can still disable this default behavior by setting the following options:
options(renv.config.ppm.default = FALSE) # New projects initialized with renv::init() will not use P3M
options(renv.config.ppm.enabled = FALSE) # Use source-only URLs
If you’re working in environments that are too different between development and production (Windows vs Linux, or different Linux distributions), I strongly recommend disabling P3M with these two options.
renv was unable to query available packages from the following repositories
Here’s the situation:
- You use
renvdaily and everything runs smoothly - You update your operating system a few months after its release to ensure stability
- You can’t install a new package
That’s exactly what happened to me after upgrading from Debian 12 to Debian 13 for our production servers. P3M only supported Debian 13 six months after its release!
We’re back to the same issue as in the previous section: since version 1.0.0, renv uses the Posit Public Package Manager by default.
As a result, the renv.lock is configured to automatically connect to this repository: https://packagemanager.posit.co/cran/latest.
Works great in most cases… unless you’re on a system that isn’t supported.
Here’s the error:
> install.packages("lubridate")
renv was unable to query available packages from the following repositories:
- # https://packagemanager.posit.co/cran/__linux__/trixie/latest/src/contrib --------
error downloading 'https://packagemanager.posit.co/cran/__linux__/trixie/latest/src/contrib/PACKAGES.rds' [error code 22]
error downloading 'https://packagemanager.posit.co/cran/__linux__/trixie/latest/src/contrib/PACKAGES.gz' [error code 22]
error downloading 'https://packagemanager.posit.co/cran/__linux__/trixie/latest/src/contrib/PACKAGES' [error code 22]


Error: package 'lubridate' is not available
Traceback (most recent calls last):
15: install.packages("lubridate")
14: eval(call, envir = parent.frame())
13: eval(call, envir = parent.frame())
12: renv::install("lubridate")
11: renv_retrieve_impl(packages)
10: handler(package, renv_retrieve_impl_one(package))
 9: renv_retrieve_impl_one(package)
 8: withCallingHandlers(renv_available_packages_latest(package),
        error = function(err) stopf("package '%s' is not available",
            package))
 7: renv_available_packages_latest(package)
 6: stopf("package '%s' is not available", package)
 5: stop(sprintf(fmt, ...), call. = call.)
 4: .handleSimpleError(function (err)
    {
        ...
    }, "package 'lubridate' is not available", base::quote(NULL))
 3: h(simpleError(msg, call))
 2: stopf("package '%s' is not available", package)
 1: stop(sprintf(fmt, ...), call. = call.)
In this case, the fix is simple. Switch back to CRAN sources:
options(repos = "https://cloud.r-project.org")
install.packages("lubridate")
Comments