On May 18, 2021, I get an email from a potential client. No small talk, straight to the point. He needs help, and he needs it fast.
Clear, conside, and, of course, urgent.
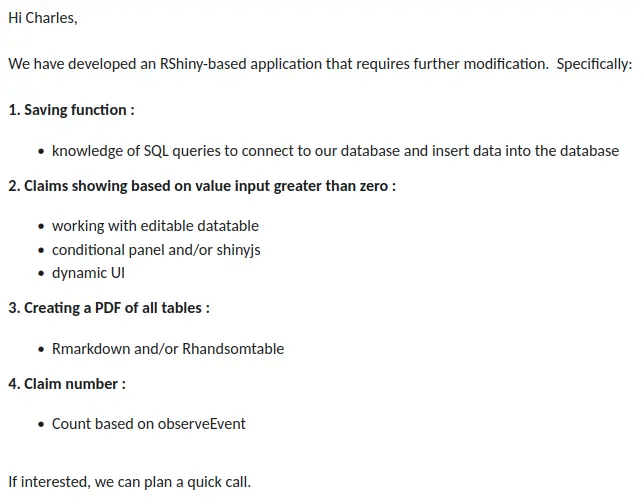
We quickly set up a call to clarify what’s needed. The client walks me through the app’s features, then shares his screen to show me the code.
He keeps talking, but my attention is already caught by something on the screen. I can’t even focus on what he’s saying
The file he’s showing me, just one module among several, clocks in at 39,043 lines of code.
I’d never seen anything like it.
I’d never even IMAGINED it.
How do you find your way around a file that size?
And did I mention he wanted to add new features, urgently?
A nightmare.
It’s not unusual for us to get codebases that are, let’s say, less than organized.
Most R users aren’t full-time developers. For many, R is just another tool in the box.
And R scripts? They’re often written for one-off analyses, then abandoned.
So, it’s no surprise we regularly inherit code that’s, well, a bit of a mess.
I’ve written my share of messy code too, especially in my early years.
But over time, I got better.
Messy code is fine at first. You move fast, things work, so you keep going.
But eventually…
It becomes unmanageable.
Every change is a slog. The app slows down. You start thinking about a rewrite, but that’s weeks of work.
And with Shiny, you’re not building something disposable. You want your app to last for years, to evolve, maybe even to be handed off to other developers.
Letting the code rot isn’t an option.
So I learned best practices. Read books. Tried frameworks like golem or rhino.
Over the years, picking up what worked, discarding what didn’t, and learning from a few painful mistakes, I built my own approach.
It’s the method we use at Data Champ’ today, a product of years of trial, error, and refinement.
If you’ve:
- already built a few Shiny apps,
- want to structure your code more professionally,
- care about maintainability and code quality,
- and want to set up good collaboration practices for your team,
this article is for you.
You know the Shiny basics. Now it’s time to leve up.
The approach I will share breaks downe into four main steps:
- 1. Structuring the project: How to organize your files and folders, break your app into modules, and keep every line of code where it belongs.
- 2. Managing the environment: Using
renvfor reproducibility, securing sensitive variables, and making sure your app runs everywhere it needs to. - 3. Ensuring code quality: Clean code, standards, general programming principles, and how to write robust, maintainable code (including tests).
- 4. Making collaboration and deployment easier: Using Git, automating with CI/CD pipelines, and documenting your project so others can jump in.
There’s a lot to cover. So in this article, we’ll focus on the first part: Structuring an R Shiny project.
The goal of this series is to give you a big-picture view, how all the pieces fit together in the way our team builds Shiny apps.
Not every recommendation will fit your needs, and that’s fine.
Take what’s useful. Leave the rest. Or come back to it later.
Recently, at the Shiny Tiny Hackathon organized by Appsilon, I put most of these principles into practice. “Most” because we only had four hours, so not everything made it in. But it’s close.
You can check out the code here:
https://gitlab.datachamp.fr/charles/shiny-tiny-hackathon
And here’s what the app looked like:

Step by step, I will walk you through the structural choices we made, and more importantly, why we made them.
1. Should you make your Shiny app as an R package?
The first Shiny app I built, back in 2016, was a rewrite of an existing project. At the time, nobody really knew what they were doing with Shiny development. The tech was only four years old.
I’d read here and there that the best way to structure your app was to turn it into a package.
There were plenty of upsides:
- It standardizes your project structure (
R/,inst/,man/, etc.) - You get a framework for writing proper documentation for your functions with
roxygen2 - Dependencies are listed in the
Importsfield of theDESCRIPTIONfile, so you don’t forget anything - Unit tests are integrated with
testthat - You can set a version number for your app/package
- You can put your app/package on Github so anyone can install it easily
A lot of advantages. I especially liked the idea of standardization and universality. Using a package structure meant other developers could jump into my code and feel at home right away.
A few years later, I tried out golem, the tool from the ThinkR team. Same idea: you build a package.
But, as always, there are trade-offs:
- You have to stick to the package structure: No
app.R, definitely noglobal.R,ui.R, orserver.Rat the root. Everything has to be wrapped in functions. - No
www/folder for your app’s resources (images, etc.). You can useinst/www/and declare it withshiny::addResourcePath(), but it’s not standard. - The package approach brings more than you need, and those extras come with constraints. For example, you don’t always need documentation as formal as what
roxygen2expects. Same for theDESCRIPTIONandNAMESPACEfiles. - You have to manage building and installing the package.
These drawbacks made me realize I liked the idea of a package structure, but didn’t need all the complexity.
So I landed on a middle ground: I kept everything I liked from the package structure, and ditched the rest.
In the end, I get all the benefits, none of the hassle.
Is it a real package? No. I don’t need it to be.
- At the project root, I keep my core files:
global.R,ui.R,server.R, which the package approach doesn’t allow. - All other R scripts are function files, stored in an
R/folder. - All my resources (images, CSS, etc.) go in the
www/folder, just as Shiny expects. - I don’t need
DESCRIPTIONto manage dependencies, because I userenv, which is better for reproducibility. - Tests don’t need a package structure to run across the whole project.
With Shiny, you don’t need a package for functions in the R/ folder to be available. Since version 1.5, Shiny automatically sources them.

Building a package is a perfectionist’s trap.
You can have a solid, maintainable, scalable, and standardized project structure without ticking every box of the “perfect package.”
For me, the three files global.R, ui.R, and server.R, are the foundation. Everything else in the app is built on top of them. They belong at the root.
Why three files? Let’s get into that.
2. The Three Core Files: global.R, ui.R, and server.R
An app.R file is fine when you’re starting out or learning, but it doesn’t scale. The last time someone sent me a Shiny app that fit in a single app.R, the file was 5,000 lines long and impossible to follow.
So, before you can do any real work, you end up spending hours just cleaning things up.
The first step is to break that app.R into three separate files:
global.R: Everything that needs to be initialized when the app starts. Loading packages, loading data, setting R options, and so on. This file should stay short.ui.R: The user interface code.server.R: The server logic, the classicfunction(input, output, session) { ... }.
This simple split already gives you:
- Lighter, easier-to-maintain files
- A clear separation of concerns: Initialization, UI, and server logic are different concepts and shouldn’t be mixed
These three files are the backbone of your Shiny app. They go at the root of your project. Every other file in the app gets called from one of these.
Separation of Concerns
In software development, "separation of concerns" means splitting your code into distinct parts, each with a clear, limited role.
This principle applies at every level:
- Function level: Each function does one thing, and does it well.
- File level: Each file groups together code with a shared responsibility (UI, business logic, etc.).
- Project level: You separate modules, tests, resources, and so on.
The goal?
- Make code stronger to read and maintain.
- Limit side effects (a local change doesn't break things elsewhere).
- Make teamwork easier, no one steps on anyone else's toes.
Bottom line: Every piece of code should have a clear job, and stick to it.
The global.R file
If you’re not used to it, it’s not always obvious what belongs in global.R. Here are a few examples:
Loading packages
We keep it simple: avoid loading entire packages unless you really need them. But some, like data.table or ggplot2, are almost always there.
library(data.table)
library(shiny)
library(ggplot2)
Loading data
Whether it’s from a database, an RDS file, Excel, or something else, you almost always need to load some data at startup.
data <- readRDS("data/data.rds")Defining global variables
Global variables are constants you’ll use throughout the app. For example, hardcoding a production year.
production_year <- 2025Setting R options
Options let you tweak how certain packages behave. For example, turning off scientific notation, or setting up a spinner for shinycssloaders.
options(
    scipen = 1000,
    spinner.type = 5,
    spinner.color.background = "#FFFFFF",
    spinner.color = "#2D2264",
)
And that’s about it. This file should stay lean.
No function definitions. They go in their own files.
No heavy data prep. Do that before the app starts.
Why a global file?
In a Shiny app, all users connect to the same R process, the same "R session".
If you load a variable in the global environment, it's available to every user.
Is that risky? Useful? Both.
Anything you load in global.R is shared across users. That can be a big win for memory optimization.
But if you're not careful, it can also be a security risk: users might see data they shouldn't.
On the other hand, anything loaded inside the server function is specific to each user session.
More info: Scoping rules for Shiny apps
Here’s a real-world example of a global.R file I used at the Shiny Hackathon:
library(data.table)
library(shiny)
library(ggplot2)
# ------ Global variables ------------------------------------------------------
ref_files <- list.files("data/refs", full.names = TRUE)
ref_list <- lapply(ref_files, data.table::fread)
names(ref_list) <- stringr::str_remove(basename(ref_files), ".csv")
custom_palette <- c(
"#023364", # dark-blue (primary) - anchor the palette with your primary brand color
"#FF7043", # orange - strong contrast to blue for clear category separation
"#80ED99", # green - complementary to the blues and orange
"#B05617", # warning amber - earthy tone that contrasts with previous colors
"#0466C8", # light-blue - return to the brand family but visually distinct
"#B71B1B", # danger red - high contrast
"#FFD4C7", # orange-30 - soft tone for variety
"#1F6F31" # success green - darker than the first green for distinction
)
# ------ Load data -------------------------------------------------------------
data_files <- list.files("data", pattern = "*.csv", full.names = TRUE)
data_list <- lapply(data_files, data.table::fread)
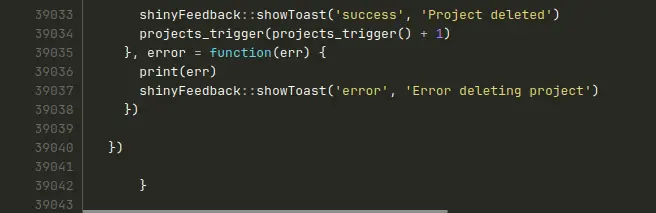
names(data_list) <- stringr::str_remove(basename(data_files), ".csv")You’ll see:
- Loading packages
- Defining global variables (reference tables, color palette)
- Loading data
That’s it. This is typical for our apps.
Notice the use of structured comments to organize the file. Another one of our style rules: six dashes, a title, fill the file to 80 characters.
# ------ Global variables ------------------------------------------------------These comments let you quickly build an outline in RStudio or VSCode
Now, let’s move on to ui.R.
The ui.R file
This one is straightforward: it holds the user interface. Usually, it’s short and just calls Shiny modules.
Here’s the Hackathon example:
bslib::page_fluid(
    title = "Shiny App",
    theme = bslib::bs_theme(
        version = 5,
        primary = "#023364"
    ),
    shinyjs::useShinyjs(),
    includeCSS("www/css/main.min.css"),
    includeScript("www/js/shiny_custom_message.js"),
    fluidRow(
        column(
            width = 12,
            class = "header",
            tags$img(
                src = "img/logo.png",
                alt = "Logo Data Champ’",
                width = "50px"
            ),
            h3("FDA Adverse Events Reporting System (FAERS) Public Dashboard")
        )
    ),
    home_ui("home")
)
Modern tools like bslib and shinyjs are in play. Here we:
- Load a CSS file and a JavaScript file
- Build a header
- Load a first module with
home_ui("home")
This app is simple, so modularization might seem overkill. But if you add more pages or tabs later, you’ll be glad you started this way.
Again: no function definitions, no variables that belong in global.R. Everything in its place.
The server.R file
Finally, the server part handles all the interactive logic.
It’s just a function, ready to be filled in:
function(input, output, session) {

}
All your code goes inside. You’ll call modules here, too.
This file tends to grow faster than ui.R. Our rule is simple:
No file should go over 500 lines.
If it does, split it up.
Here’s the hackathon example:
function(input, output, session) {

    # ------ INITIALIZE --------------------------------------------------------
    # Initialize session variables
    session$userData$disclaimer_accepted <- FALSE

    # ------ MODULES -----------------------------------------------------------

    # ------ * Disclaimer ------------------------------------------------------
    if (Sys.getenv("HIDE_DISCLAIMER") != "true") {
        showModal(modalDialog(
            title = NULL,
            footer = NULL,
            easyClose = FALSE,
            size = "l",
            disclaimer_ui("disclaimer")
        ))
        disclaimer_server("disclaimer")
    }

    # ------ * Home ------------------------------------------------------------
    home_server("home")

}
In short:
- Initialize a session variable:
session$userData$disclaimer_accepted - Call two modules
That’s it.
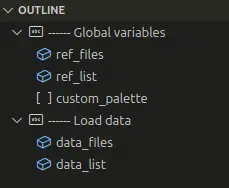
Notice the structured comments again. I use uppercase for main sections, an asterisk for code blocks. This structure shows up in the IDE outline, making the hierarchy clear.
At this point, you’ve got three files:
my-shiny-project/
├── global.R
├── ui.R
└── server.R
Next step: break things into Shiny modules.
3. Modularizing your app with Shiny modules
Intimidated by modules?
You shouldn’t be.
People often think modules are some “advanced” Shiny feature. That’s a myth.
A module is just a function. You wrap up code that would normally go in ui.R or server.R, and call that function instead.
Just like a function can call other functions, a module can call other modules.
You can build out a whole hierarchy that mirrors your app’s structure.
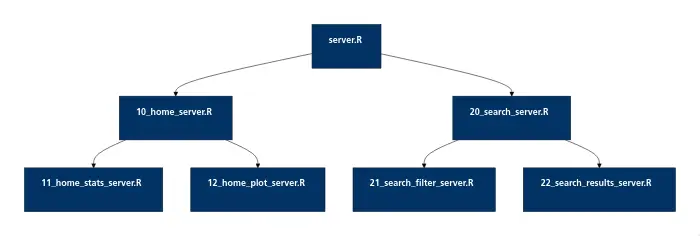
Here’s a sample architecture with two levels of modules:
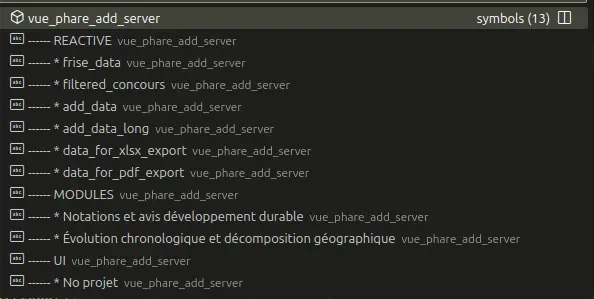
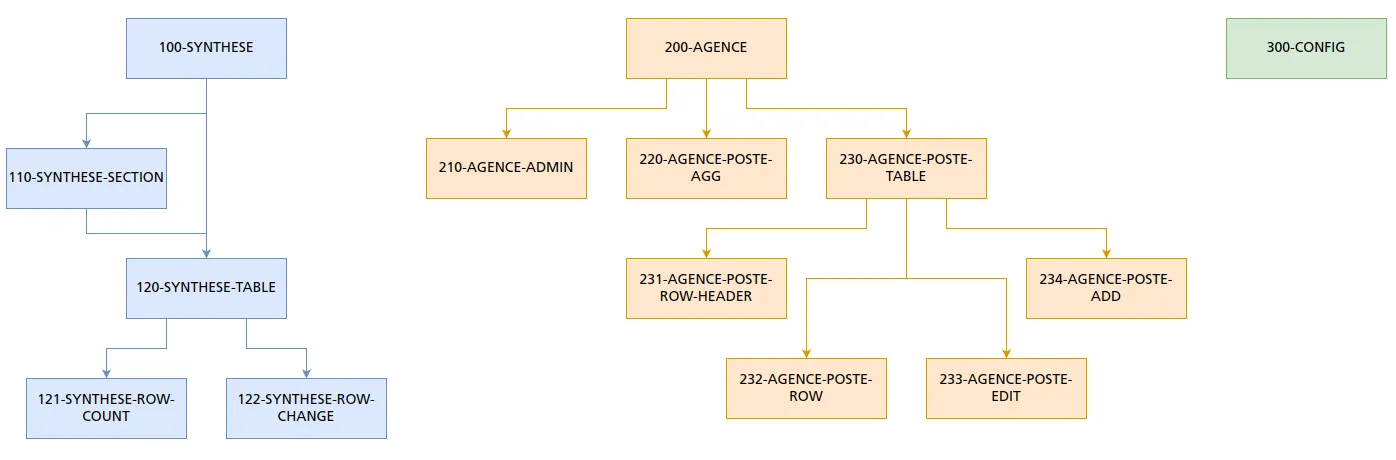
Here’s another, more complex example from a real project:
That’s all you need to follow the rest of this section.
If you want to see how it works under the hood, check out: Modularizing Shiny app code.
The key point: modules are functions. So, they go in the R/ folder.
The goal is to keep your code organized and avoid files with thousands of lines.
My rule is simple:
No file should ever go over 500 lines.
Even 500 is a lot.
If a file gets bigger than that, it’s probably mixing too many concepts and b reaking the Separation of Concerns principle.
That’s your cue to split it up.
Modularizing made simple
The classic approach: one module per screen.
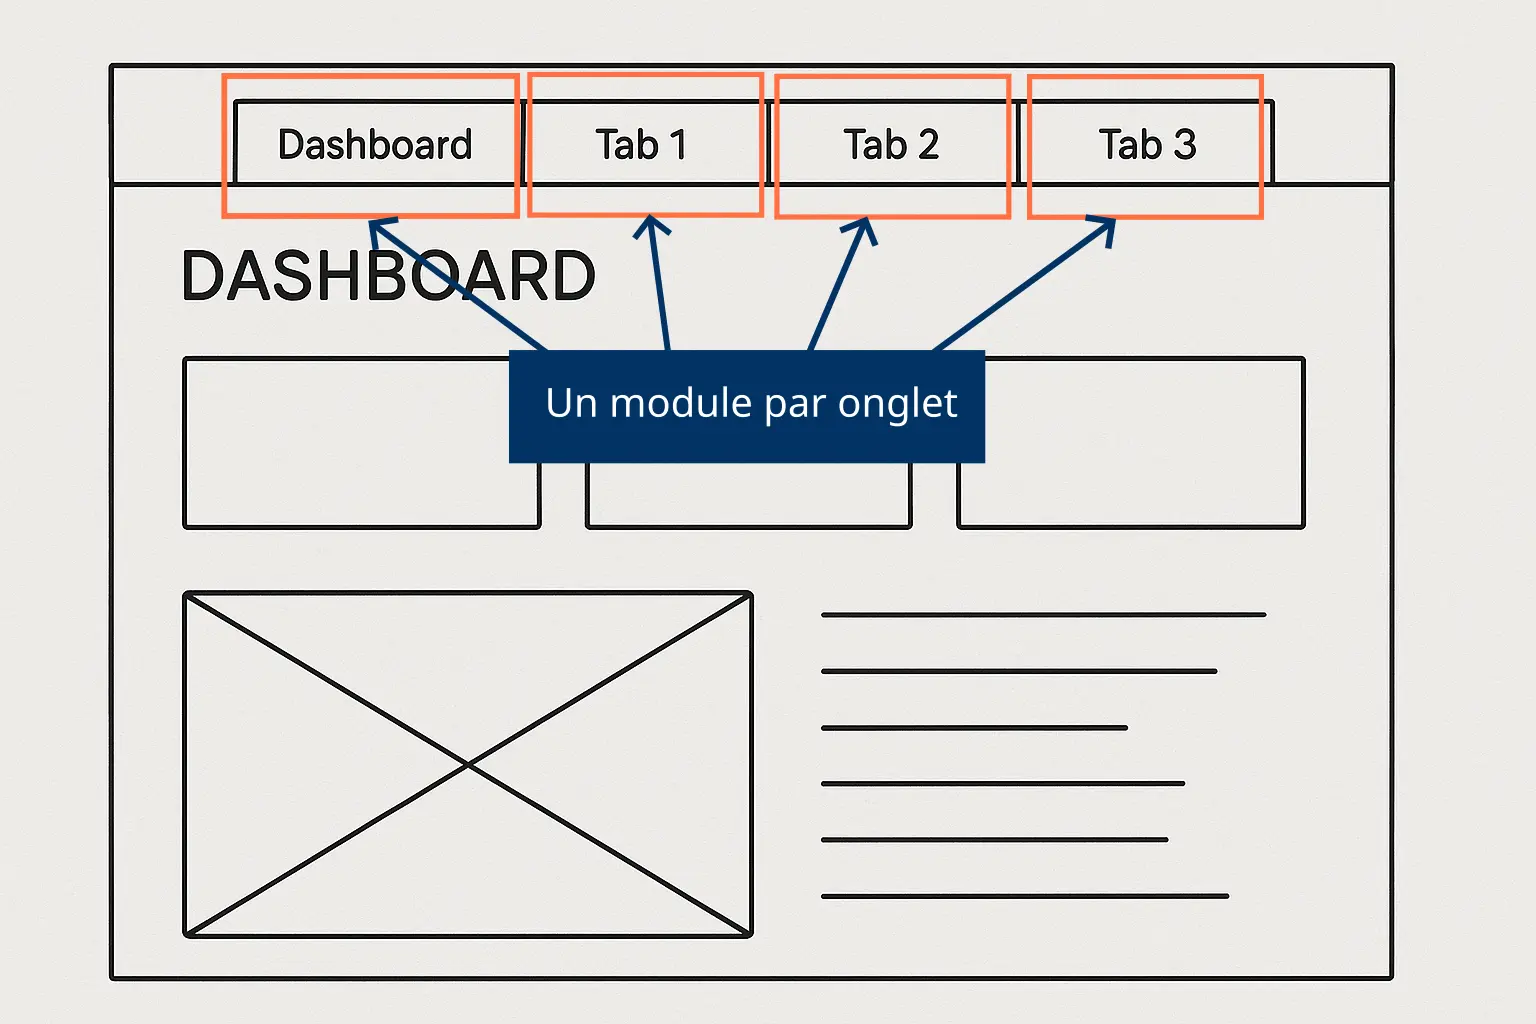
Use bslib::navset_bar() with one screen per tab, and you get a logical one-module-per-screen split.
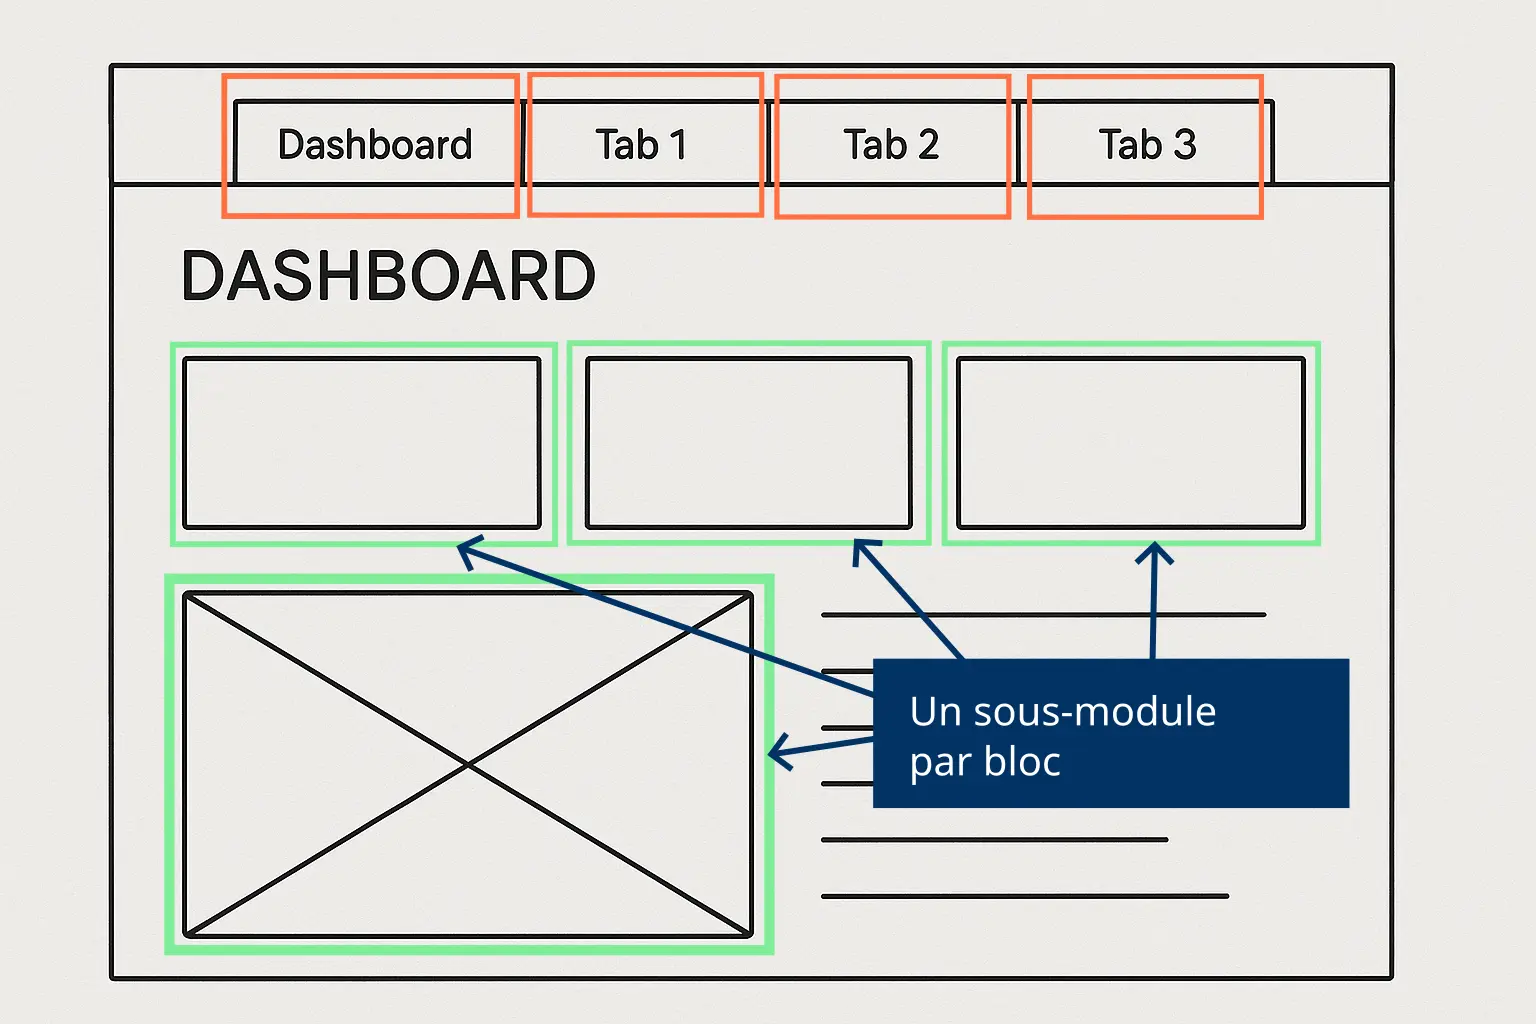
Sometimes a screen is too busy. In that case, break it down into modular zones.
A module is split into three files:
- UI file: The UI part of the module.
- Server file: The server function for the module.
- Functions file: Optional, for functions used only by this module.
Module UI file
Here is a basic template:
module_name_ui <- function(id) {
    ns <- NS(id)
    div(
        id = ns("main")
    )
}
You need an id argument and the ns object (namespace). Then fill in the UI as usual.
Naming rule: module_name_ui, all in snake_case. For example: home_ui(), search_ui(), disclaimer_ui().
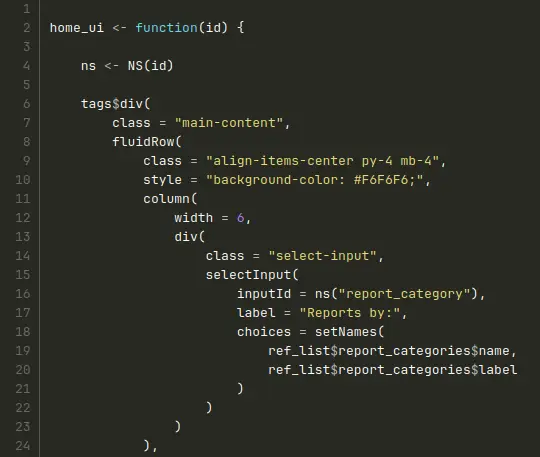
Here is a more complete example from the Shiny hackathon:
Module server file
The server side is a bit more involved:
module_name_server <- function(
    id
) { moduleServer(id, function(input, output, session) {
    ns <- session$ns

    # ------ REACTIVE ----------------------------------------------------------

    # ------ MODULES -----------------------------------------------------------

    # ------ OUTPUT ------------------------------------------------------------

    return(values)
})}
You might wonder about the formatting. Why not write it like this?
module_name_server <- function(
    id
) {
    moduleServer(id, function(input, output, session) {
        # code
    })
}
If you do that, your code is always double-indented. Not ideal, especially if you use four spaces per indent and keep lines under 80 characters, like we do.
That’s why I use the single-indent style from above:
module_name_server <- function(
    id
) { moduleServer(id, function(input, output, session) {
    # blabla
})}
Notice also the structured comments for the usual server-side sections.
Finally, the naming mirrors the UI: home_server(), search_server(), disclaimer_server().
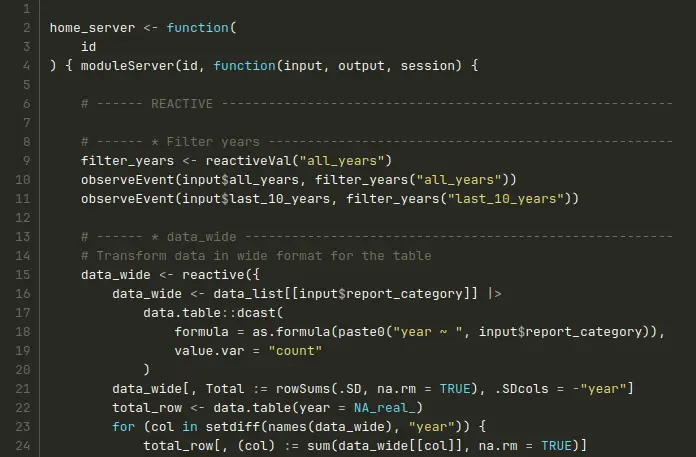
Here is the Shiny hackathon example:
Module functions file
One last file: the functions file.
This one is optional. Use it if you need functions specific to this module. Otherwise, put general-purpose functions elsewhere.
Naming module files
One last point: file naming
It matches the function names: for a home_ui() module, the file is home_ui.R.
But we go further: modules are numbered to reflect their order in the app. Usually, you have tabs, so number modules by tab order:
10_home_ui.Rfor the first tab20_search_ui.Rfor the second- and so on
Why 10, 20, and not just 1, 2?
Because of submodules. The 10_home_ui module might have three submodules:
11_title_ui.Rfor the title12_graph_ui.Rfor the plot13_table_ui.Rfor the table
At first, I thought numbering would be a pain, that I would waste time constantly renaming files. In practice, it’s rare, especially if you plan your app’s architecture a bit.
And it’s worth it: files are automatically sorted in a logical order, so you don’t wast time searching.
Even better: in VSCode, I hit Ctrl+P, type the number, and open the file in seconds.

You might have noticed the module architectures above use this numbering scheme:
At this point, your project structure is taking shape:
my-shiny-project/
├── R/
    ├── 100_home_server.R
    ├── 100_home_ui.R
    ├── 200_search_server.R
    └── 200_search_ui.R
    ├── 300_disclaimer_server.R
    └── 300_disclaimer_ui.R
├── global.R
├── server.R
└── ui.R
Next: how to structure the rest of your files.
4. Structuring the rest of your files
What about everything else? Depending on the project, your folder tree can get pretty deep.
Data
If your app uses data files (CSV, Excel, RDS, etc.), put them in a data/ folder.
Note: Usually, don’t version data files with Git.
Another note: Never put data in the www/ folder. That folder is served by Shiny, meaning anything inside is accessible from the web. You probably don’t want your raw data public.
For the hackathon, I prepped a few CSVs and a reference table. Everything went in data/ and data/refs/:
data/
├── refs/
    ├── report_categories.csv
├── age_group.csv
├── report_type.csv
├── reporter.csv
├── reporter_region.csv
├── seriousness.csv
└── sex.csv
Data preparation
Sometimes, your data changes regularly and needs to be pre-processed before the app can use it.
Rule: avoid heavy data processing inside the Shiny app. It just slows things down.
Instead, do the prep outside the app. Store your data prep scripts in a data_prep/ folder.
Then use a scheduler (like cron) to run those scripts as needed.
### renv
We use renv to manage R packages and guarantee reproducibility across environments.
To a full renv tutorial here, just know it creates:
- The
renv/folder for installed packages - The
renv.lockfile - An
.Rprofilefile (if it doesn’t exist) to auto-load renv
More details: Introduction to renv
The www/ resources folder
The www/ folder holds everything your app needs that isn’t R code:
www/css/for CSS fileswww/html/for HTML templateswww/img/for imageswww/js/for JavaScriptwww/sass/for SASS if you use thesasspackage
You don’t have to use all these, but Shiny serves files from www/ by default.
If you want to use a different folder, you’ll need to declare it with shiny::addResourcePath().
Organizing your CSS
I like to use SASS for all CSS. SASS is a preprocessor that gives you variables, functions, loops, and more.
More info: libSass and R sass package.
Most apps we get have a single style.css file with thousands of lines. Not great.
Here’s our approach:
Split CSS into four sections:
- Base CSS: Main colors, fonts, text sizes, etc.
- Components: One file per component (table, selectInput, etc.)
- Layout: The app’s skeleton (header, footer, tabs, etc.)
- Pages: CSS specific to certain pages
Each section gets its own subfolder in www/sass, with multiple files as needed. For example, www/sass/components has one file per component.
Then, www/sass/main.scss pulls everything together. Here’s an example from the Shiny hackathon:
// Base
@import "base/variables";

// Components
@import "components/grid-table";
@import "components/select-input";
@import "components/value-box";
@import "components/checkbox";

// Layout
@import "layout/body";
@import "layout/footer";
@import "layout/header";
@import "layout/modal";
Finally, we have a standard R/sass.R file in every project:
sass::sass(
    input = list(
        sass::sass_file("www/sass/main.scss")
    ),
    output = "www/css/main.min.css",
    options = sass::sass_options(output_style = "compressed")
)
All SASS code is precompiled into a compressed CSS file: www/css/main.min.css, which you load in ui.R with includeCSS("www/css/main.min.css").
If you want to dig deeper, check out the Shiny hackathon code.
Root-level files
You will also find a handful of files at the project root:
.gitignorefor Git exclusions.gitlab-ci.ymlfor Gitlab CI/CD pipelines.lintrfor thelintrpackage that checks code quality.Renvironfor environment variablesREADME.mdfor general project documentation
Each of these is important and we will cover them in future articles.
Test files
Finally, a tests/ folder holds all project tests.
Inside, you’ll find tests/testthat.R, usually very short, just enough to run all tests, for example:
shinytest2::test_app()Here, we run all end-to-end tests with the shinytest2 package.
And actual test files go in tests/testthat/.
Final project structure
Here’s what a typical Shiny project looks like:
my-shiny-project/
├── data/
    ├── refs/
        ├── report_categories.csv
    ├── age_group.csv
    ├── report_type.csv
    ├── reporter.csv
    ├── reporter_region.csv
    ├── seriousness.csv
    └── sex.csv
├── data_prep/
    ├── data_prep.R
├── R/
    ├── 100_home_server.R
    ├── 100_home_ui.R
    ├── 200_search_server.R
    └── 200_search_ui.R
    ├── 300_disclaimer_server.R
    └── 300_disclaimer_ui.R
├── renv/
├── tests/
    ├── testthat.R
    └── testthat/
├── .gitignore
├── .Renviron
├── global.R
├── README.md
├── renv.lock
├── server.R
└── ui.R
You now have a complete overview of how to properly structure a Shiny app:
- The three core files at the root (
global.R,ui.R,server.R) - Modular code (no more 39,000-line monsters)
- A coherent folder structure with a place for everything
- Simple rules: no file over 500 lines
This method is designed to be simple, avoid unnecessary constraints, and make your apps easy to maintain.
And this is just the first step.
In future articles, we’ll cover environment management, code quality, and collaborating with other developers.
Comments