When I wrote The Ultimate Guide to Deploying a Shiny App on AWS almost a decade ago, AWS was the obvious popular choice.
Today, I avoid it.
I stopped using AWS for our internal infrastructure since 2019. And I don’t recommend it for most of our clients.
Why?
AWS is expensive and AWS is complicated.
In this guide, I want to show you an alternative.
You can host a Shiny app on a VM for $5 a month.
Really.
You will need three things:
1. A few hours initially.
How many hours depends on your tech savviness.
If you have never touched a server before, it will take more time.
But you can learn.
This guide is intended for full beginners as well as for more advanced users who can skim through some of the most basic sections.
2. Five bucks a month.
That’s the price for a VM with 4 GB of RAM.
Most Shiny apps will work on this setup.
If you really need more, it tends to increase linearly with the amount of RAM you need.
3. A Shiny app.
Yes. That’s what this article is about.
If you don’t have a Shiny app, go build one and come back when you need to deploy it.
Most apps are a perfect fit for this deployment method. But as always, there are exceptions.
Here are some reasons why this guide would not work for you:
- You need high availability over multiple continents in the world.
- You need to scale automatically to thousands of nodes.
- You need SOC 2 or HIPAA compliance.
- You don’t want to manage servers yourself
All of these reasons are perfectly legitimate. Not every solution is for everyone.
And there is a special case: If you need a database such as PostgreSQL or MariaDB. If that’s your case, this guide will help you do most of the work. However, you will also need to install, configure, and manage the database yourself, and this part is not covered in the guide.
Let’s get started.
Order your VM
I have been working with Hetzner since 2019 and I’m really happy with their services. That’s why I’m using them in this guide.
But there are alternatives: OVHcloud, Contabo, infomaniak. I’m actually also working with OVHCloud sometimes.
In the rest of this guide, and especially when it comes to provisioning the server, I will use Hetzner as an example.
The first step is to order your VM (Virtual Machine).
What is a Virtual Machine?
A Dedicated Server is a physical computer located in a datacenter and rented only to you.
You control everything on it: operating system, partitions, even hardware.
Downside: when hardware fails, you must notice it and ask the onsite team to swap the part.
A Virtual Machine (VM) is simply a slice of that server, carved out by a hypervisor.
You pick how much CPU, RAM, and disk the VM gets, and you can upgrade or downgrade those resources with a click.
In practice a VM gives you almost the same freedom, costs a lot less, and leaves the hardware headaches to the host.
Understand Hetzner Cloud
Go to Hetzner Cloud and scroll down the page a little bit.

You will have to choose the type of VM, which determines the number of CPU cores, RAM, storage, etc. The types are organized in four categories:
- Shared vCPU Intel: The cheapest options with the weaker CPUs. CPUs are shared among multiple VMs.
- Shared vCPU AMD: Much better CPUs, but they are still shared among multiple VMs.
- Shared vCPU Ampere: Avoid this one. It’s using a different CPU architecture (arm64) that is not compatible with our project here.
- Dedicated vCPU: The best CPUs, and they are not shared, but it is slightly more expensive.
My recommendations
- Pick a location that is close to you. If you are in Europe, any option works. If you are in the US or in Asia, then avoid the first category of shared vCPU Intel.
- The most important metric is the amount of RAM first, and then the performance of the CPU. The number of vCPUs is not important because the Shiny app will run on 1 vCPU.
Note that you can always change later. That’s the power of using VMs. You can change from an Intel CPU to an AMD CPU at any time. The only requirement is that you pick a CPU that is available in your location, and the location cannot be changed.
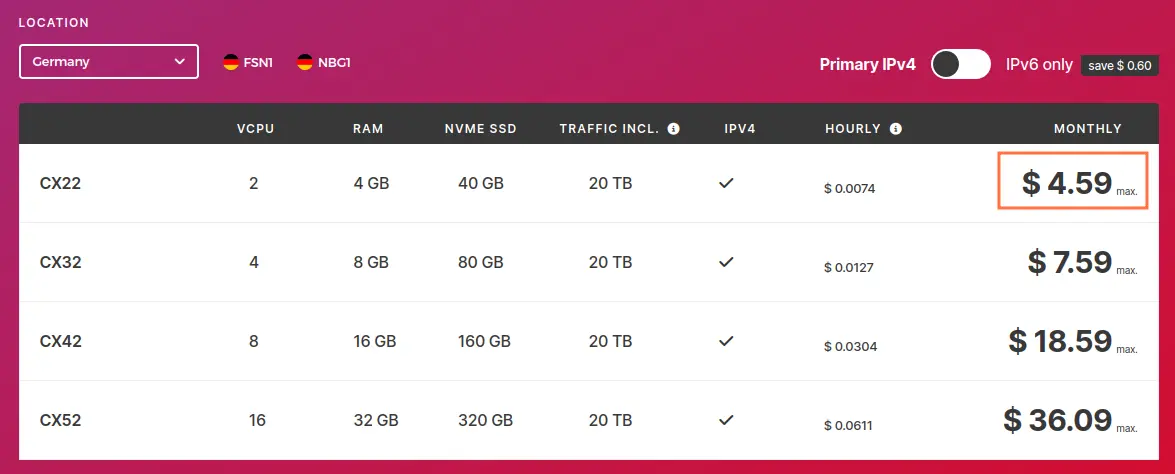
I will choose CX22 for 4 GB of RAM with an Intel vCPU:

Once you have made your choice, click on Get started at the bottom of the table.
You will be asked to create an account, after which you will land on this page:

You can see I already have five Projects.
A Project is like a directory: it helps you organize your VMs. For example, you might have one directory per client.
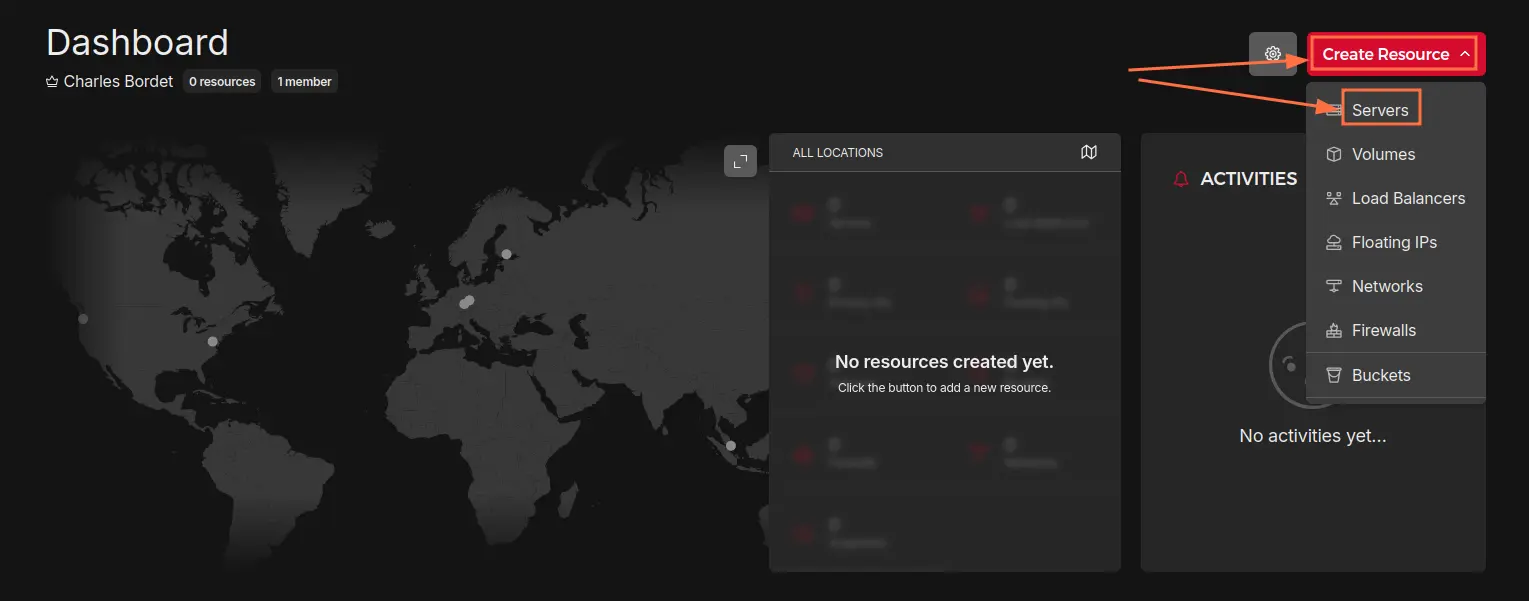
Create a project, give it a name, and then click on Create Resource / Servers.
Launch your VM
This is where you configure your VM.
Location
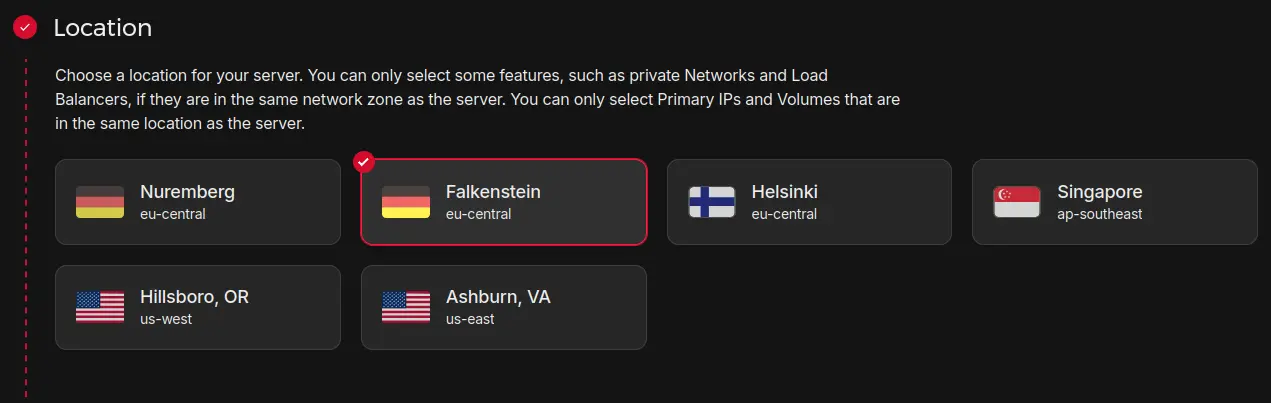
I recommend you pick a location close to you. Or, even better: close to your users.
For me, I will pick Falkenstein, in Germany.
Image
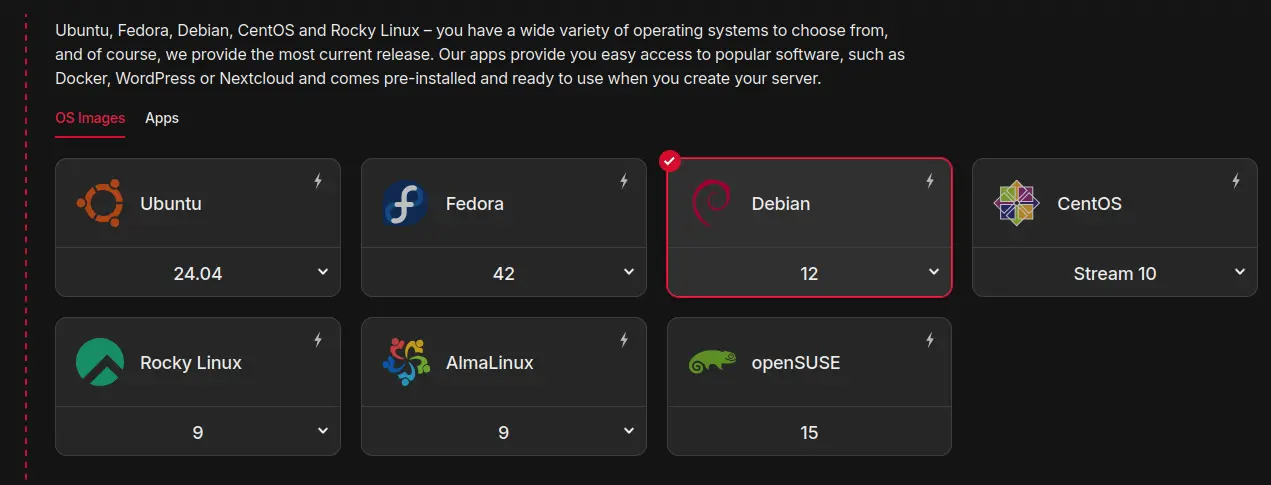
The image is the Operating System that will be installed on the VM.
No MacOS or Windows here.
The world of servers is dominated by Linux.
Most Linux distributions come from two main flavors: Debian-based or RHEL-based (Red Hat Enterprise Linux).
- Debian-based: Ubuntu and Debian
- RHEL-based: Fedora, CentOS, Rocky Linux, AlmaLinux
- OpenSUSE plays in its own ecosystem, we’ll ignore it here
Both families work. It is mostly a matter of habits.
I have been using Ubuntu Desktop for my laptop for many years now, so there is no hesitation for me. I will always feel more comfortable towards Debian-based distributions.
This guide will also follow the Debian route.
Now, how to choose between Ubuntu and Debian?
Ubuntu Server tends to have newer packages, has a huge community, and there is always the option to get commercial support from Canonical, the editor. It is very common to see it in production servers.
Debian on the other hand tries to keep a minimal footprint, favor older packages and has very conservative updates.
So while I run Ubuntu Desktop on my laptop, I strongly prefer to use Debian on my servers. The stability it offers leads to fewer surprises over the long term.
That’s what we we’ll use in this guide: Debian 12.
Note that Debian 13 will be released in just a few months, so depending on the time you’re reading this guide: Pick the most recent version.
Type
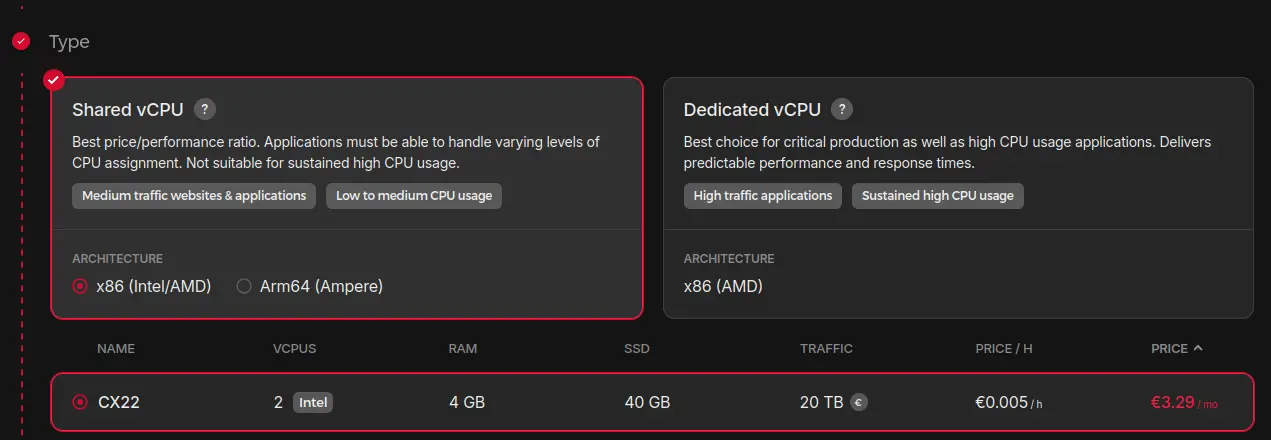
This is where you can pick the VM type you chose earlier.
Note that not all VM types are available in all locations.
For example, the CX22 I want to pick is available in Falkenstein, but not in Nuremberg, despite both locations being in Germany.
Networking

I recommend you pick IPv4 and IPv6.
SSH keys
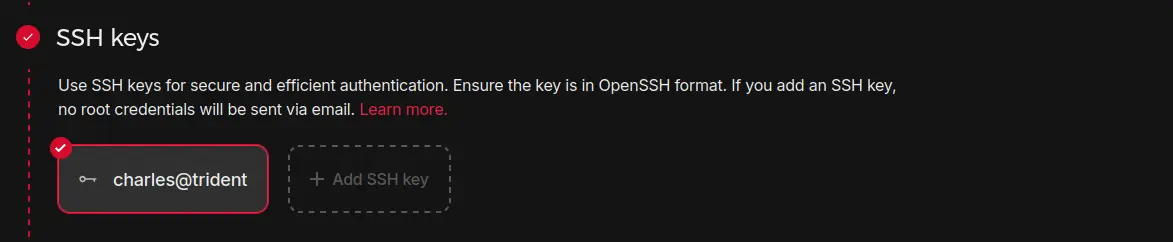
You should be familiar with SSH keys if you’ve been working with Git and Github.
An SSH key is an access credential that is used as part of the SSH protocol.
And what is the SSH protocol?
Think of it like HTTP. HTTP is a protocol that allows your browser and servers to communicate with each other so that you can visit websites. A protocol is a set of rules and a language that we decide to use to communicate with each other. And each protocol is specialized in some kind of communication.
Well, SSH is used for communication between users and servers. You will use SSH to open a terminal on the remote server and type commands that will execute on the remote server.
An SSH key pair consists of two files:
- the public key: It is named “public” because it is not a secret. This is the part that you give to Github when you’re using Git. Similarly, this is the part that you will give to the server.
- the private key: This is a secret, and it should never leave your computer.
When you open an SSH connection, the protocol runs some smart algorithm to ensure that you are who you claim to be, and then it encrypts the entire communication.
Using an SSH key is better than using a password because it is much harder to guess, it can be automated, and it cannot be brute-forced.
To create an SSH key, I recommend you follow this article from the Github Docs:
Generating a new SSH key and adding it to the ssh-agent
Or follow these instructions:
- If on Windows, then install Git Bash from https://git-scm.com/downloads. During installation, you can keep all options by default.
- Still on Windows: Open Git Bash.
- On Linux or MacOS, open a terminal.
- Type the following command:
ssh-keygen -t ed25519 -C "name@host" - Don’t use a passphrase and keep the default filename.
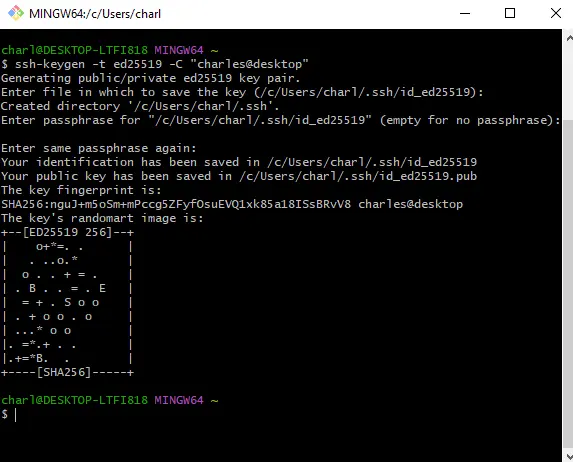
These steps will create two files:
~/.ssh/id_ed25519: This is the private key~/.ssh/id_ed25519.pub: This is the public key, as indicated by the file extension
The ~ is the symbol for the home directory. On Windows, it will be C:\Users\charles, while on Unix systems, it will be /home/charles.
Open the public key in a text editor, and add it to Hetzner.
Volumes
Volumes can be useful when you intend to store a lot of data.
The VM will generally be limited in terms of how much storage you can have, while volumes can hold as much as 10 TB of data.
We will not use Volumes here.
Firewalls
Firewalls are not needed, because:
- We will not host a service that need to be protected from external traffic
- We can configure a firewall directly on the VM
However:
- It is still useful in case we misconfigure a service. That’s the principle of having multiple layers of security.
- Configuring the firewall directly on the VM is a good idea… until you lock yourself out!
You cannot imagine how many times I locked myself out of my VM… This is so stupid.
Having the possibility to control the firewall from outside the VM is useful for this specific reason.
So… let’s not do it for now, but we’ll get back to it later.
Backups
I highly recommend you enable the backups if the app and the data it contains are valuable to you.
The server will cost 20% more, but you will have daily backups for the past 7 days.
If you’re only following this guide as an exercise, then you can keep it unchecked.
The next three items: Placement groups, Labels and Cloud config are not useful to us.
Let’s skip to the last section.
Name
Give a descriptive name to your server.
If you want to create a VM that will host all your Shiny apps, you can simply call it shiny.
If you expect later to have a fleet of VMs to host Shiny apps, you can also call it shiny1, in anticipation for the next ones.
Once you’re ready, you can click on Create & Buy now.
Wait a few seconds… and your server is ready!

Take note of your IP address because we will use it right away.
Connect to your VM
Remember in the SSH keys section when you created an SSH key pair?
We are going to use it now to SSH into your server.
Open a terminal again (or Git Bash if you’re on Windows) and type the following:
ssh [email protected]Don’t forget to update the IP address with the one from your VM.
You will receive a message asking whether you should trust the host that responded to you:
The authenticity of host '23.88.114.164 (23.88.114.164)' can't be established.
ED25519 key fingerprint is SHA256:krzeRLL+lBvGE7OEG/0nWCJy47L4K6ADQGDRy/zJ2WE.
This key is not known by any other names.
Are you sure you want to continue connecting (yes/no/[fingerprint])?
Realistically, you have no way of verifying that you’re really talking to the Hetzner’s VM and that there is not a Man-in-the-Middle attack going on. With that said, you can reply “yes”.
You will connect to the server and the welcome message will get displayed:
Linux shiny 6.1.0-33-amd64 #1 SMP PREEMPT_DYNAMIC Debian 6.1.133-1 (2025-04-10) x86_64

The programs included with the Debian GNU/Linux system are free software;
the exact distribution terms for each program are described in the
individual files in /usr/share/doc/*/copyright.

Debian GNU/Linux comes with ABSOLUTELY NO WARRANTY, to the extent
permitted by applicable law.
root@shiny:~#
It tells you the version of the Linux kernel (6.1.0-33-amd64), that your system contains only free software, and that it comes with ABSOLUTELY NO WARRANTY.
Congratulations are in order.
You have done the hardest part.
Secure your VM
On your terminal, you should see what’s called the prompt:
root@shiny:~#This contains a lot of information:
rootis the user you are controlling right now.rootis the superadmin of the machine, it can do everything.@is a separator between the username and the machine. It’s like saying “I’m James from Minnesota” except it says “I’mrootfromshiny”.shinyis the machine you’re on. I named itshinyduring creation from the Hetzner website.:is a separator~is the path, it tells you where you are on the machine. Remember,~is the home directory. For userroot, that’s in/root/.#is a symbol. It is#when you are root, and it will be$when you are a simple user.
From there, you can type commands, such as:
lsto display the list of files (lsstands for “list”).pwdto display where you are (pwdstands for “print working directory”).touch testto create an empty file namedtest.rm testto delete the file you just created (rmstands for “remove”).- and so on…
Could you please type a special command for me?
journalctl -u sshHere is what I get:
mai 26 15:52:38 shiny sshd[943]: Invalid user guest from 193.24.211.22 port 36651
mai 26 15:52:38 shiny sshd[943]: pam_unix(sshd:auth): check pass; user unknown
mai 26 15:52:38 shiny sshd[943]: pam_unix(sshd:auth): authentication failure; logname= uid=0 euid=0 tty=ssh ruser= rhost=193.24.211.22
mai 26 15:52:40 shiny sshd[943]: Failed password for invalid user guest from 193.24.211.22 port 36651 ssh2
mai 26 15:52:40 shiny sshd[943]: Received disconnect from 193.24.211.22 port 36651:11: Client disconnecting normally [preauth]
mai 26 15:52:40 shiny sshd[943]: Disconnected from invalid user guest 193.24.211.22 port 36651 [preauth]
mai 26 15:53:03 shiny sshd[949]: Invalid user ubuntu from 92.118.39.66 port 59898
mai 26 15:53:03 shiny sshd[949]: pam_unix(sshd:auth): check pass; user unknown
mai 26 15:53:03 shiny sshd[949]: pam_unix(sshd:auth): authentication failure; logname= uid=0 euid=0 tty=ssh ruser= rhost=92.118.39.66
mai 26 15:53:05 shiny sshd[949]: Failed password for invalid user ubuntu from 92.118.39.66 port 59898 ssh2
mai 26 15:53:06 shiny sshd[949]: Connection closed by invalid user ubuntu 92.118.39.66 port 59898 [preauth]
mai 26 15:56:07 shiny sshd[953]: error: kex_exchange_identification: Connection closed by remote host
mai 26 15:56:07 shiny sshd[953]: Connection closed by 2.57.122.57 port 39102
What are we even looking at here exactly?
These are connection attempts. The first attempt tried to connect with user guest, while the second attempt tried to connect with user ubuntu.
You might see something slightly different. And actually, if you’ve been fast, you might not even see any logs yet except your own successful connection. But they will come. I counted 60 “Failed password” attempts in the first hour after I created the VM.
See, there are bots out there whose only job is to try every single IPv4, knock at the door, and try to get in. What we’re looking at are the logs of the SSH service that records these attempts. With “only” 4 billions addresses, it takes around an hour for a scanner to go through all IP addresses.
The internet is not a nice place. Fortunately, we can mitigate these efforts. Here is what we are going to do in the next few steps:
- Create a simple user so that we don’t directly use the
rootuser. - Harden the SSH configuration to forbid root login and password login.
- Install
fail2banto block brute force attacks. - Configure
unattended-upgradesto install security updates automatically. - Set up a firewall.
Create your user
The goal here is to reduce the risk of having your server compromised by using the root user.
It’s convenient to have a user that can do everything… but it’s also risky.
We use the principle of least privilege: Do not use an admin role for running simple tasks. Keep the admin role only for administrative actions.
Create your user and give it a password:
adduser charlesAnd add it to the sudo group:
usermod -aG sudo charlesThis simple action will give the ability to user charles to run commands as an admin, but only when such commands are explicitly prefixed by sudo.
For example, as user charles, if you run sudo apt update, it will work, because that’s an administrative task. But if you run apt update only, it will fail.
Next, we want to be able to SSH into user charles directly. For now, we are SSH-ing into root, which is not ideal.
To do so, we will copy/paste the SSH configuration of root directly inside charles home directory:
cp -r /root/.ssh /home/charles/.
chown -R charles:charles /home/charles/.ssh # This line ensures the files belong to charles
Verification steps:
- Close and re-open your terminal.
- Try to SSH with
ssh [email protected](adapt with your user and IP). - Try to run a command as admin:
sudo journalctl -u ssh.
From now on, you will only use this user and not root anymore. Since we still have a lot of administrative tasks to run, we will use the prefix sudo for such operations.
Harden the SSH configuration
There are two changes we want to make to the default SSH configuration:
Forbid to directly connect as root. This will protect malicious attempts trying to connect as root.
echo "PermitRootLogin no" | sudo tee -a /etc/ssh/sshd_config.d/50-custom.confThen, we want to forbid SSH connections with passwords, because passwords are not secure enough compared to SSH keys.
echo "PasswordAuthentication no" | sudo tee -a /etc/ssh/sshd_config.d/50-custom.confOnce you’re ready…
Wait.
You are SURE you can connect with SSH to your normal user?
Because if not, the change we are making here will prevent you from SSH-ing to root. So if SSH to your normal user doesn’t work, you will lock yourself out.
Alright.
Restart the SSH service to take the new configuration into account:
sudo systemctl restart sshdBlock brute force attacks
At this point, you should be safe.
But, just in case, we can do one more step.
fail2ban is a software that will detect brute force attacks and ban IP addresses. When it bans the addresses, it means they’re immediately rejected by the server (no questions asked).
Simply install it:
sudo apt update
sudo apt install fail2ban
You can see that the service is automatically running by typing:
sudo systemctl status fail2banUh oh… It doesn’t work for me:
× fail2ban.service - Fail2Ban Service
     Loaded: loaded (/lib/systemd/system/fail2ban.service; enabled; preset: enabled)
     Active: failed (Result: exit-code) since Mon 2025-05-26 16:48:53 UTC; 30s ago
   Duration: 150ms
       Docs: man:fail2ban(1)
    Process: 2751 ExecStart=/usr/bin/fail2ban-server -xf start (code=exited, status=255/EXCEPTION)
   Main PID: 2751 (code=exited, status=255/EXCEPTION)
        CPU: 137ms

mai 26 16:48:53 shiny systemd[1]: Started fail2ban.service - Fail2Ban Service.
mai 26 16:48:53 shiny fail2ban-server[2751]: 2025-05-26 16:48:53,323 fail2ban.configreader   [2751]: WARNING 'allowipv6' not defined in 'Definition'. Using default one: 'auto'
mai 26 16:48:53 shiny fail2ban-server[2751]: 2025-05-26 16:48:53,335 fail2ban                [2751]: ERROR   Failed during configuration: Have not found any log file for sshd jail
mai 26 16:48:53 shiny fail2ban-server[2751]: 2025-05-26 16:48:53,341 fail2ban                [2751]: ERROR   Async configuration of server failed
mai 26 16:48:53 shiny systemd[1]: fail2ban.service: Main process exited, code=exited, status=255/EXCEPTION
mai 26 16:48:53 shiny systemd[1]: fail2ban.service: Failed with result 'exit-code'.
I see a warning about IPv6. Really I couldn’t care less about IPv6, so let’s ignore it.
Then I see a real error: Have not found any log file for sshd jail.
Ah.
A jail is a piece of configuration used by fail2ban to detect the brute force attacks and ban the IP addresses. Traditionally, it looks into log files to run the detection.
But over the years, logs are less and less written in log files. Instead, they are replaced by this journalctl command we’ve been using since earlier. And the default configuration of fail2ban hasn’t yet made the move.
There is an old issue on Github about this: Fail2Ban not starting when enabling sshd (systemd backend missed) and apparently they decided to classify it as “not planned”.
Anyway.
Let’s recreate the jail properly. Open a text editor:
sudo nano /etc/fail2ban/jail.localYou might not be familiar with using a text editor directly in the terminal. I recommend nano here because it is simple enough, but if you like pain you can use vim as well.
Enter the following configuration:
[DEFAULT]
bantime = 10m
findtime = 10m
maxretry = 5
[sshd]
enabled = true
backend = systemd
port = ssh
To save and exit, you must:
- Use Ctrl + X to exit.
- It will ask: “Save modified buffer?”. Reply by typing Y
- It will ask: “File Name to Write: /etc/fail2ban/jail.local”. Hit Enter
And you’re good.
Try cat /etc/fail2ban/jail.local to ensure the content has been correctly saved.
Next, install this dependency so that fail2ban can work with systemd:
sudo apt install python3-systemdNow you can finally restart the fail2ban service and it should run successfully:
sudo systemctl restart fail2ban
sudo systemctl status fail2ban
● fail2ban.service - Fail2Ban Service
Loaded: loaded (/lib/systemd/system/fail2ban.service; enabled; preset: enabled)
Active: active (running) since Mon 2025-05-26 17:04:36 UTC; 1min 0s ago
Docs: man:fail2ban(1)
Main PID: 3830 (fail2ban-server)
Tasks: 5 (limit: 4531)
Memory: 16.8M
CPU: 350ms
CGroup: /system.slice/fail2ban.service
└─3830 /usr/bin/python3 /usr/bin/fail2ban-server -xf start
mai 26 17:04:36 shiny systemd[1]: Started fail2ban.service - Fail2Ban Service.
mai 26 17:04:37 shiny fail2ban-server[3830]: 2025-05-26 17:04:37,043 fail2ban.configreader [3830]: WARNING 'allowipv6' not defined in 'Definition'. Using default one: 'auto'
mai 26 17:04:37 shiny fail2ban-server[3830]: Server readyConfigure automatic security updates
I was hesitant to add this section.
Because when I show it to my clients, and I come back a few months later, I see this:
130 updates can be installed immediately.
0 of these updates are security updates.
To see these additional updates run: apt list --upgradable

*** System restart required ***
They think everything is good and they never need to worry about updates.
This is not true.
If I tell you you NEED to run updates on a regular basis… are you going to do it?
I think most of you won’t.
That’s why, at least for security updates, it’s good and convenient to run them automatically.
That’s the role of unattended-upgrades, a small utility that will keep your server current with the latest security updates automatically.
It is easy to set up:
sudo apt install unattended-upgrades apt-listchanges
sudo dpkg-reconfigure -plow unattended-upgrades
Note that there is always a risk that these automatic updates break your app. But really, this is rare. By rare I mean that I’ve never seen it happen, but theoretically it could happen.
And it doesn’t mean you should never run upgrades. Some of them are important. And some require you to reboot your server. Rebooting the server is as simple as sudo reboot.
Set up a firewall
Back in the 2000s, it was common to have a firewall on your computer. Today, nobody really remember what they were for.
Your computer is connected to the internet like any other machine. That’s how you can send requests to servers, and servers send you responses that are converted into a website getting displayed on your screen.
What is the difference between your computer (the “client”) and the server?
We name them “client” and “server” based on their roles, but really, there is no difference. They are two machines connected with each other through the gigantic web that is the internet.
So, if you can send requests to another machine… Anybody else can send requests to YOU as well?
Yep.
And that’s why you needed a firewall in the 2000s. To block inbound requests you didn’t ask for.
And then, long story short, we realized that 4 billions of IPv4 addresses were not enough, so we set up routers in front of our personal computers, and these routers basically protect us from being reached out from the outside.
But that’s not the case for servers.
Servers need to be accessed by anyone from the internet. Otherwise they won’t reach your Shiny app.
Including malicious users.
The firewall will be used to ensure we only expose the services that need to be exposed, and nothing more. They reduce the attack surface.
You can configure them in two layers:
- Block all incoming requests except on certain ports. Typically, we authorized only the ports for SSH, HTTP, and HTTPS.
- Block all incoming requests except for some IP addresses. For example you allow only your IP address to connect with SSH.
Remember fail2ban? It works closely with the firewall. Whenever it ban a malicious user, it actually adds an entry in the firewall to block incoming requests from a specific IP address.
OK, enough discussed.
Uncomplicated Firewall (UFW)
You can install ufw to easily configure a firewall:
sudo apt install ufwWe configure it to only authorize SSH, HTTP, and HTTPS:
sudo ufw allow ssh
sudo ufw allow http
sudo ufw allow https
Then, enable ufw so that the rules take effect:
sudo ufw enableYou will receive a scary message:
Command may disrupt existing ssh connections. Proceed with operation (y|n)?
What does this mean?
Because you are adding a rule on SSH, this could unauthorize yourself to connect with SSH. While it is not the case here, you must always be extra careful when modifying the firewall rules.
It’s really easy to lock yourself out.
And then you’re good to either:
- Restore a backup.
- Restart the server in rescue mode, mount the root environment with
chroot, and update the firewall rules.
To prevent this risk, you can also configure the firewall directly from the Hetzner interface.
Hetzner Firewall
Go back to the Hetzner account and choose Firewalls in the sidebar menu.
Add the following inbound rules:
- Protocol ICMP. Just keep it.
- Protocol TCP, port 22. This is for SSH.
- Protocol TCP, port 80. This is for HTTP.
- Protocol TCP, port 443. This is for HTTPS.
For the outbound rules, that will apply to the requests that you send from the server. Keep this empty to authorize all outbound traffic.
Apply it to the server you have created. Give it a name. And create it.
Using Hetzner Firewall does not provide any extra security compared to using ufw. The main benefit is that you can administrate from outside the server, so there is no way to lock yourself out.
Which in itself is a pretty good benefit, I’d say.
Alright.
We are done securing the server! We can move on to getting the Shiny Server ready!
Install R and Shiny Server
Install R on Debian
Installing R on Debian used to be a bit messy.
I told you earlier how Debian is the distribution that tends to be the most stable. It means that they keep the good old working versions of softwares, and you get a new version only when you upgrade to a new major version of Debian.
- Debian 10, released in July, 2019, came with R 3.5.2.
- Debian 11, released in August, 2021, came with R 4.0.4.
- Debian 12, released in June, 2023, came with R 4.2.2. This is the latest Debian version today.
Debian 13 will be released during Summer of 2025 and will likely be shipped with R 4.4.3. Considering the history, and because Debian wants to be stable, it is highly unlikely they will release it with R 4.5.0, which is too cutting edge.
Also check our article Which version of R to use in production? to understand why using R 4.5.0 today in production is not a good idea.
All of that to say that you don’t really get to choose the version you want easily.
Plus, if you already have a version and install a new one, it will replace the previous one. You can have only one version of R at a time.
That’s not great when over the years you have many projects using many different versions of R.
Fortunately, things have changed.
A small company named Posit built binaries for each version of R and for each distribution of Linux.
Simply go to Install R (link) and follow the instructions. The description at the top of the page says it all:
« The recommended installation instructions for R covers making multiple versions of R available, and avoid replacing existing versions of R when updating system packages. »
You can skip the part about RHEL 9 or RHEL 8. This is not for us Debian users. When you scroll down a little bit, you will need to:
- Pick your version of R.
- Download the desired version. Make sure you take the commands from the Debian tab.
- Verify R installation.
- Create a symlink to R.
Below are the commands you should type in your terminal. I recommend you check out the Posit website though in case these changes:
# Specify R version
export R_VERSION=4.4.3

# Download and install R
curl -O https://cdn.posit.co/r/debian-12/pkgs/r-${R_VERSION}_1_$(dpkg --print-architecture).deb
sudo apt-get update
sudo apt-get install ./r-${R_VERSION}_1_$(dpkg --print-architecture).deb

# Verify R installation
/opt/R/${R_VERSION}/bin/R --version

# Create a symlink to R
sudo ln -s /opt/R/${R_VERSION}/bin/R /usr/local/bin/R
sudo ln -s /opt/R/${R_VERSION}/bin/Rscript /usr/local/bin/Rscript
Now, when you type R in the terminal, it should open an R console.
You can use q() to exit the R console. Or use the standard shortcut Ctrl + D.
charles@shiny:~$ R

R version 4.4.3 (2025-02-28) -- "Trophy Case"
Copyright (C) 2025 The R Foundation for Statistical Computing
Platform: x86_64-pc-linux-gnu

R is free software and comes with ABSOLUTELY NO WARRANTY.
You are welcome to redistribute it under certain conditions.
Type 'license()' or 'licence()' for distribution details.

  Natural language support but running in an English locale

R is a collaborative project with many contributors.
Type 'contributors()' for more information and
'citation()' on how to cite R or R packages in publications.

Type 'demo()' for some demos, 'help()' for on-line help, or
'help.start()' for an HTML browser interface to help.
Type 'q()' to quit R.

> 1+1
[1] 2
> q()
Save workspace image? [y/n/c]: n
While you’re at it, it would be a great idea to install the shiny package. Let’s install it and make it available for the entire system, so we’ll start the R console with sudo:
sudo RAnd install shiny:
install.packages("shiny")It will take a few minutes, and you’re good to continue.
Install Shiny Server on Debian
Shiny Server comes in two flavors:
- Shiny Server Open Source, which is a free software released under the AGPLv3 licence.
- Shiny Server Pro, which RStudio-now-Posit is not commercializing anymore, as it has been superseded with Posit Connect.
Unfortunately, using Posit Connect would not let us keep the cost under $5, hence we will use Shiny Server Open Source instead.
To install Shiny Server, follow the instructions from the installation page (link).
At the top of the page, select Ubuntu and then the latest version available. At the time of this writing, you should pick Ubuntu 18.04+.
Why Ubuntu?
Well, do you see a Debian option?
As explained earlier, Ubuntu and Debian share a common base. What works for one tends to work for the other as well.
You can skip Step 2 about installing the shiny package. We’ve already done that earlier.
In Step 3, you’re downloading the Shiny Server binary and installing it:
wget https://download3.rstudio.org/ubuntu-20.04/x86_64/shiny-server-1.5.23.1030-amd64.deb
sudo apt install ./shiny-server-1.5.23.1030-amd64.deb
Don’t forget then to remove the file you downloaded, just to keep things clean:
rm https://download3.rstudio.org/ubuntu-20.04/x86_64/shiny-server-1.5.23.1030-amd64.debAt this point, Shiny Server is installed and has already been automatically started. It always comes with a default app that can be reached from the internet.
How can you access it?
See, Shiny Server is a service, and it listens on a port.
A port is like a door from which outside requests get in your server. There can be only one service behind a port. It listens, meaning it patiently waits for requests to get in. Once it receives a request, it processes it and sends a response.
Shiny Server is listening on port 3838.
So you could check your default Shiny app by typing {ip_address}:3838 in your browser. For example: 23.88.114.164:3838.
Waiting…
Waiting…
TIMEOUT.
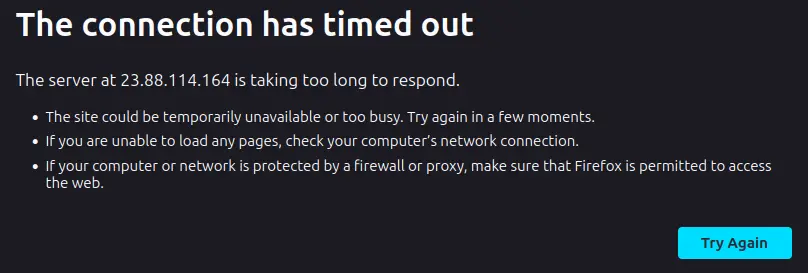
What happened?
Don’t you remember?
When setting up the firewall, we blocked every port except 22 (SSH), 80 (HTTP), and 443 (HTTPS).
Port 3838 is blocked. That’s why your request never gets a reply.
This is good. Later in the guide, we will configure a web server, whose role will be to receive the requests, “do something with it”, and then forward it to the Shiny Server. It will act as an intermediary for security reasons and no request will directly reach Shiny Server without going through the web server.
And if you didn’t block port 3838, malicious users could circumvent this web server by trying to reach the Shiny Server directly. Not good.
So, feel free to update the firewall and enable port 3838 temporarily, to try things out, but remember to disable it again.
Here is the default app you would see:
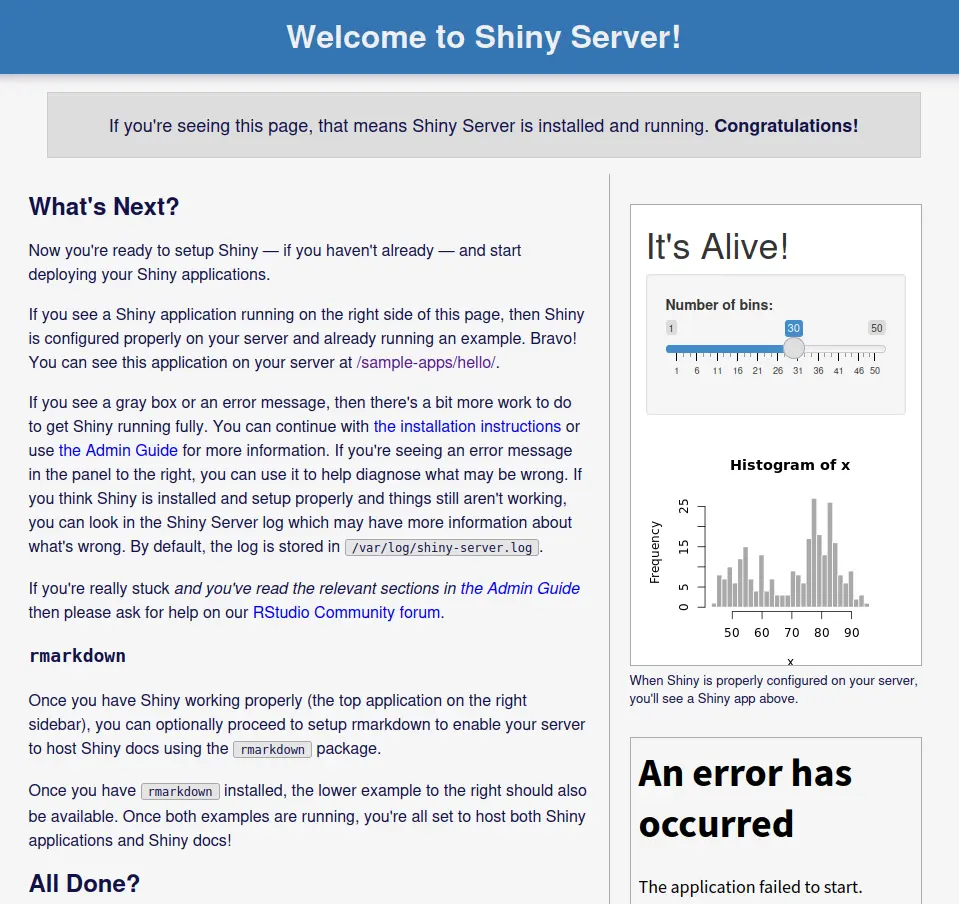
Notice the errors at the bottom right of the page? That’s because we didn’t install all necessary packages. Don’t worry about this for now.
Configure Shiny Server
Shiny Server comes with a default configuration, which you can find in /etc/shiny-server/shiny-server.conf. Try this command to display it:
cat /etc/shiny-server/shiny-server.confYou should see this:
# Instruct Shiny Server to run applications as the user "shiny"
run_as shiny;

# Define a server that listens on port 3838
server {
  listen 3838;

  # Define a location at the base URL
  location / {

    # Host the directory of Shiny Apps stored in this directory
    site_dir /srv/shiny-server;

    # Log all Shiny output to files in this directory
    log_dir /var/log/shiny-server;

    # When a user visits the base URL rather than a particular application,
    # an index of the applications available in this directory will be shown.
    directory_index on;
  }
}
You can see a few things:
- It is run by user
shiny. In fact, the usershinywas automatically created on the server when installing Shiny Server. This is good, meaning the service is not run byroot, it is run by a user that does not have admin privileges. - It listens on port 3838. You knew that already.
- The code will need to be placed in the directory
/srv/shiny-server. - The logs will be stored in
/var/log/shiny-server. - A directory index will be shown when a user visits the base URL.
There are a few things we want to change here:
We want to add preserve_logs true;. This configuration will retain ALL log files. By default, only log files that contain errors are kept, and log files from successful sessions are discarded. In practice, I find that even when errors occurred sometimes the log files are still discarded. I prefer to keep all of them, and clean them from time to time.
Change the listen line into listen 3838 127.0.0.1;. This means that Shiny Server will listen on port 3838 only from requests coming from 127.0.0.1, which is the equivalent of localhost, a specific IP address representing this server. In short, Shiny Server will only accept requests that come directly from this server.
Why? Again, we will add a web server that will act as an intermediary. Only the web server should reach the Shiny Server directly. This security practice is redundant with the firewall, and it is always good to have redundancy in security.
Turn off the directory_index. If you’re hosting multiple apps, you might not want all users to see every app you have available.
This is the updated configuration file:
# Instruct Shiny Server to run applications as the user "shiny"
run_as shiny;
preserve_logs true;
# Define a server that listens on port 3838
server {
    listen 3838 127.0.0.1;
    # Define a location at the base URL
    location / {
        # Host the directory of Shiny Apps stored in this directory
        site_dir /srv/shiny-server;
        # Log all Shiny output to files in this directory
        log_dir /var/log/shiny-server;
        # When a user visits the base URL rather than a particular application,
        # an index of the applications available in this directory will be shown.
        directory_index off;
    }
}
Open the file with sudo nano /etc/shiny-server/shiny-server.conf, and update the values accordingly. Then, restart the Shiny Server service:
sudo systemctl restart shiny-serverHere are a few other configuration steps.
First, remove the default app:
sudo rm -R /srv/shiny-server/*Then, change the owner of the /srv/shiny-server directory, so that user shiny can write its own code files:
sudo chown shiny:shiny /srv/shiny-server/Finally, set the shell to bash for the shiny user, it will be more convenient for you later:
sudo usermod -s /bin/bash shinySet up the production environment
The next step is to get your Shiny app code on the server. This will involve:
- Installing the necessary system dependencies.
- Working with user
shiny - Downloading the code
- Installing the R packages
Install the necessary system dependencies
My code is on Gitlab, so I will need Git to clone the repository:
sudo apt install gitThen, let’s run an experiment. Try to install the xml2 package:
sudo Rinstall.packages("xml2")You should get the following error:
* installing *source* package ‘xml2’ ...
** package ‘xml2’ successfully unpacked and MD5 sums checked
** using staged installation
Using PKG_CFLAGS=
Using PKG_LIBS=-lxml2
------------------------- ANTICONF ERROR ---------------------------
Configuration failed because libxml-2.0 was not found. Try installing:
 * deb: libxml2-dev (Debian, Ubuntu, etc)
 * rpm: libxml2-devel (Fedora, CentOS, RHEL)
 * csw: libxml2_dev (Solaris)
If libxml-2.0 is already installed, check that 'pkg-config' is in your
PATH and PKG_CONFIG_PATH contains a libxml-2.0.pc file. If pkg-config
is unavailable you can set INCLUDE_DIR and LIB_DIR manually via:
R CMD INSTALL --configure-vars='INCLUDE_DIR=... LIB_DIR=...'
-------------------------- [ERROR MESSAGE] ---------------------------
<stdin>:1:10: fatal error: libxml/tree.h: No such file or directory
compilation terminated.
--------------------------------------------------------------------
ERROR: configuration failed for package ‘xml2’
* removing ‘/opt/R/4.4.3/lib/R/library/xml2’
When you install an R package on Windows, it’s usually very quick. That’s because the packages are already available as binaries. They already have been pre-compiled, so the only operation left is downloading the file and decompressing it on your computer.
However, the CRAN does not provide binaries for Linux. It means you have to download the source code and compile the code yourself.
In some cases, this compilation step requires you to have a specific software on the server. Typically, if the package contains C++ code, you would need a C++ compiler. Fortunately, Linux systems always come with a C++ compiler natively.
In this case, you need a system library named libxml2-dev, and what you need to install depends on the Linux flavor you’re using. That’s what you see in these three lines:
Configuration failed because libxml-2.0 was not found. Try installing:
 * deb: libxml2-dev (Debian, Ubuntu, etc)
 * rpm: libxml2-devel (Fedora, CentOS, RHEL)
 * csw: libxml2_dev (Solaris)
Try to install the one for Debian:
sudo apt install libxml2-devAnd try the installation again:
install.packages("xml2")After a few compilation steps, it should work successfully.
I show you this example because we will install more packages later on. And exactly which packages you will install, as well as which system dependencies you will need, depend on which packages you are using. Obviously.
Could you just install all system dependencies in advance?
No.
First, that’s a waste of time and resources.
Second, by doing that, you’re increasing your surface of attack. Remember that on a server, security is key. The less you install, the better.
Use user shiny
I mentioned earlier that Shiny Server automatically created a user shiny. This is good because:
- A service should never be run as root. If the service were compromised, the
rootuser would be compromised, and the entire server could be used for malicious acts. - This
shinyuser has no admin privileges. It it’s compromised, only the Shiny Server service would be impacted.
So far, I told you to use your own user. Now, we’re going to switch using the user shiny with this command:
sudo su - shinyYour prompt should become:
shiny@shiny:~$
We are user shiny in the VM shiny in our home directory.
If instead you only see a single $, it means you didn’t set correctly the shell for user shiny, which was the last step of configuring the Shiny Server.
Remember that user shiny has no admin privileges. So you cannot run commands starting with sudo anymore. We won’t need it anyway.
Download your code
I highly recommend to put your production code on a Git server: Github, Gitlab, or anywhere else.
For me, my code is stored there:
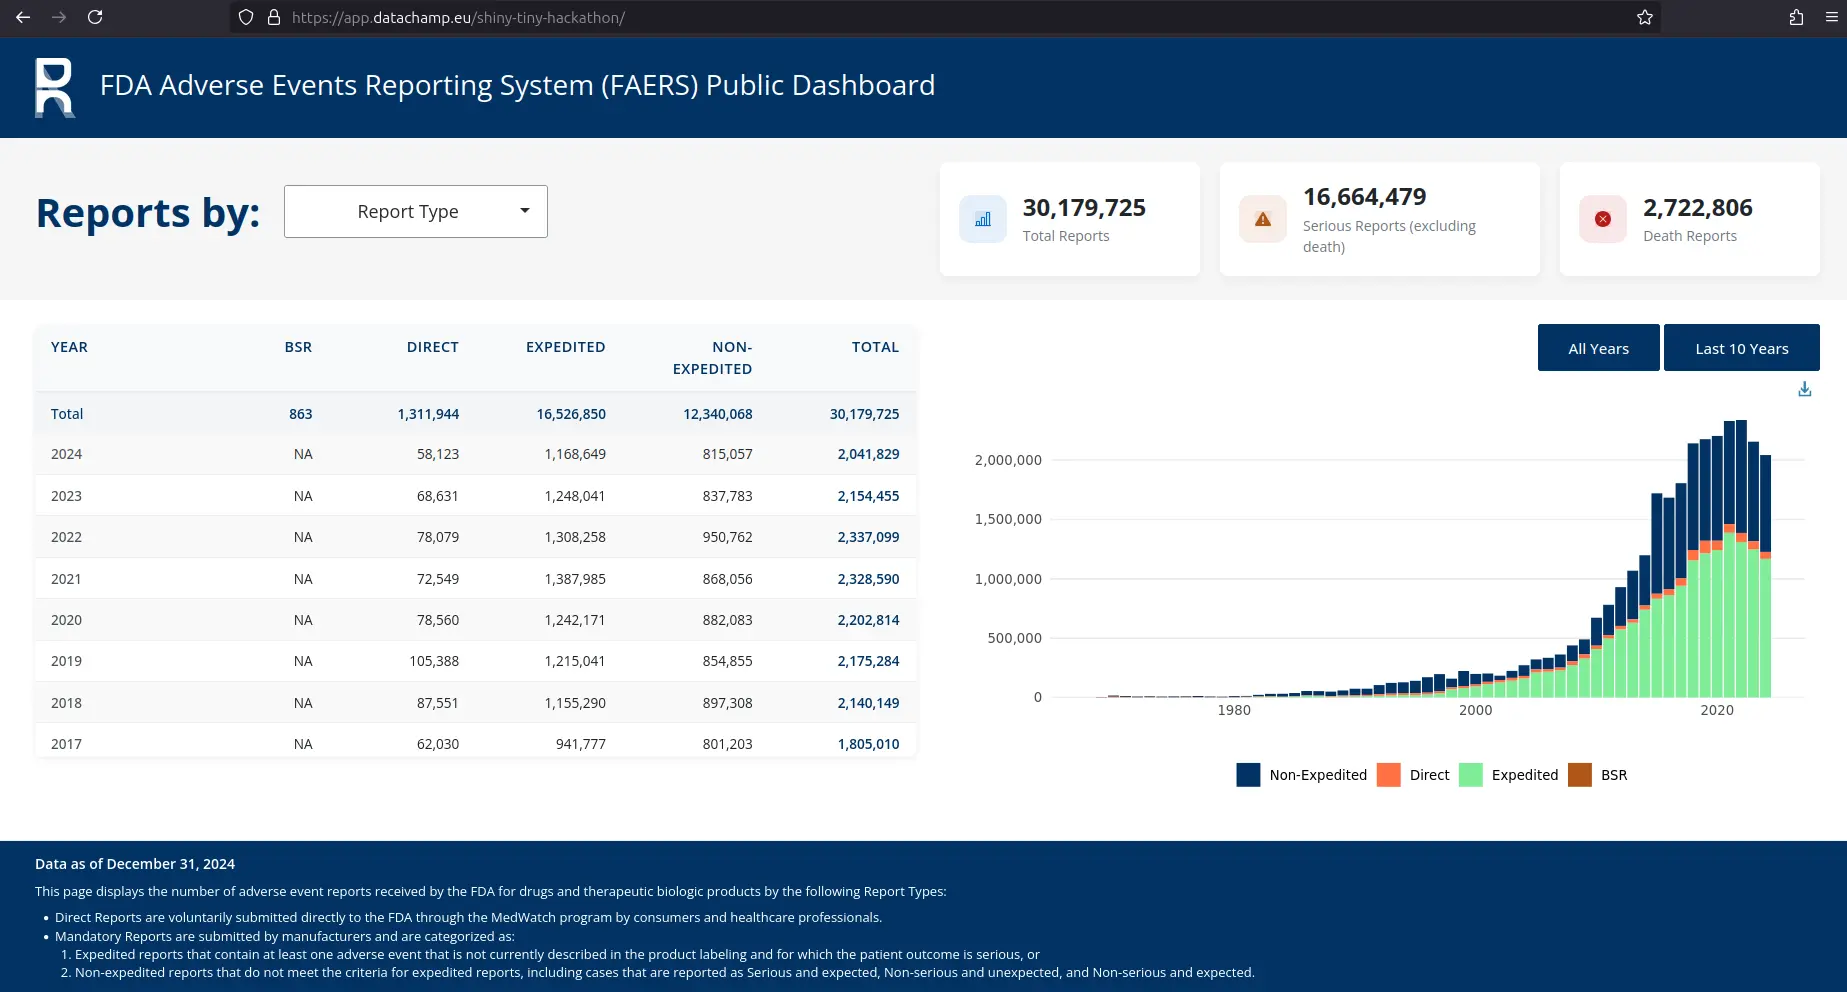
https://gitlab.datachamp.fr/charles/shiny-tiny-hackathon
If you don’t have a Shiny app yet, you can use my app as well. Let’s go to the /srv/shiny-server directory and clone the repository there:
cd /srv/shiny-server
git clone https://gitlab.datachamp.fr/charles/shiny-tiny-hackathon.git
Install the R packages
Next, enter the directory:
cd shiny-tiny-hackathonIn my project, I’m using renv, which really makes it easy to restore installed packages in the exact same versions they’re supposed to be.
If you’re not using renv, do whatever it takes to re-install your packages. Maybe you have a script to automate it, maybe your app is an R package, I trust you know how to install packages for your app.
What I love about renv is that it will automatically tell me which system dependencies I need (this is a recent featured introduced in version 1.1.2):
> renv::restore()
The following required system packages are not installed:
- libfontconfig1-dev  [required by systemfonts]
- libpng-dev          [required by ggiraph]
- pandoc              [required by knitr, rmarkdown]
The R packages depending on these system packages may fail to install.

An administrator can install these packages with:
- sudo apt install libfontconfig1-dev libpng-dev pandoc
And it will use the RSPM to install the packages, which speeds up the process by a lot!
RStudio Public Package Manager
The RSPM, recently renamed P3M for Posit Public Package Manager, is a platform similar to CRAN from which you can install R packages.
I told you earlier how the CRAN didn't propose binaries for Linux.
Well, the P3M does. It means you don't have to build the packages from source, so the installation will be much faster.
Go to https://packagemanager.posit.co/ and click SETUP to specify your environment. Follow the instructions to proceed.
R and Shiny Server have been installed. You prepared the code and installed all the necessary R packages. There is only one step left: Installing a web server.
Install and configure your web server with nginx
Why are we even using a web server? Isn’t Shiny Server enough by itself?
No it’s not.
A web server will have the following roles that a Shiny Server cannot do:
- Serve the TLS certificates to encrypt the requests through HTTPS.
- Optimize the requests.
- Protect internal services from outside access.
- Log all incoming requests.
No worries, everything will be explained and I will show you how to do it step by step. At the end of this section, your app will be available on an address such as https://app.example.com.
Let’s start with… something else.
Choose your domain name
Your domain name is essential since that’s what users will be typing to access your app.
Nope, you cannot ask your users to remember your IP address.
Plus, getting a domain name is an essential part of configuring HTTPS.
In my case, for the purpose of this guide, I will use datachamp.eu, which I already own.
If you don’t own a domain name yet, there are multiple places you can buy them from:
- Cloudflare: My recommendation (more on that below).
- Hetzner: I didn’t even know you could buy a domain name from them before writing this guide (but that makes sense to use them).
- OVH: This is where I buy most of my domains.
- Hover: This is where I used to buy most of my domains.
So many choices.
I originally worked only with Hover, and I still have a few domains there. What I like about them is that they don’t offer a trillion services. When you land on their home page, you can immediately see that selling domain names is their main expertise.
However, they don’t sell .fr domains. And for me that’s an issue.
That’s why I switched to OVH. Had I known Hetzner was selling domain names, I might have switched to them, but I didn’t even know or look for it.
So… why is Cloudflare my recommendation?
There is a difference between where you buy your domain name and where you configure your domain name.
And it happens that I centralize my domain name configuration (also called DNS configuration) on CloudFlare. I love Cloudflare because:
- The interface is easy to use.
- It has great free services, including some protection against DDoS attacks, and many others.
- It is highly performant, being among the fastest DNS resolvers.
- It can provide free TLS certificates (although we won’t use this feature in this guide).
I only use the free services from Cloudflare and I’m probably underutilizing it by a lot.
That’s why I recommend you buy your domain names there. You don’t have to, but it’s just easier to centralize everything. In the rest of the guide, I will show you how to configure the DNS from Cloudflare. But really, if you prefer to do everything on Hetzner for example, feel free to do so.
Configure your DNS
Your server address is the IP address: 23.88.114.164.
It’s like your phone number. That’s what people type on their phone to reach out to you.
Do you think your friends know your phone number?
I’m sorry to be the bringer of bad news: They don’t.
They registered you as a contact in their phone so they just have to type or select your name and hit Enter and it calls you.
It’s similar for a website. Nobody remembers the IP address of their favourite websites. Instead they type a domain name. And at some place there must be something like a contact book where the correspondance between the domain name and IP address is registered.
That’s the DNS registry. And that’s why you’re using a DNS provider, such as Cloudflare, to register your entry in the DNS registry that is shared globally.
You will add an entry that says: “app.datachamp.eu redirects to 23.88.114.164”.
Let’s do it with Cloudflare. I’m already logged in, I have selected my domain name, and went into the DNS > Records page. This is what I see:
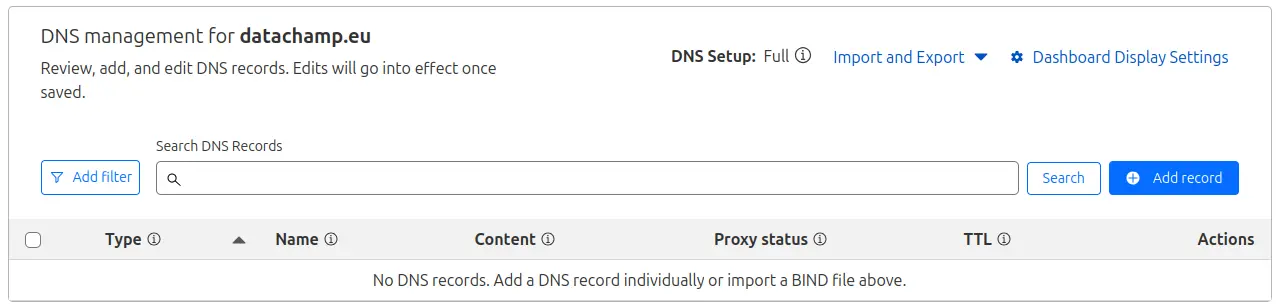
Let’s click on Add record and fill the fields as follow:
- Type: A
- Name:
app- if you want to use the main domain name (datachamp.euin my case) then type@ - IPv4 address: 23.88.114.164
- Proxy status: Disabled
- TTL: Auto
What is this proxy status thingy? It’s actually a very useful feature of Cloudflare. If you enable it, requests to your server will first go through Cloudflare servers. It feels like a detour right? Yes, but you get these benefits:
- DDoS protection: Since it first reaches Cloudflare servers, Cloudflare can stop a DDoS attack before it even reaches your server.
- Caching: Static content (images, CSS files, JS files, etc.) will be cached automatically. See Cloudflare Cache page. It means Cloudflare will directly return a response to the client, while the request won’t even reach your server, in effect saving your server some workload.
- Hide your Server IP: If someone looks up your domain’s IP, it’s Cloudflare server that will show up, in effect hiding your server IP, making it harder to target your server directly.
- Automatic HTTPS: No need to worry about configuring HTTPS, it will be done automatically by Cloudflare proxy so that traffic is encrypted between the client and the proxy. However… it will NOT be encrypted between the proxy and the server, which is a major security flaw.
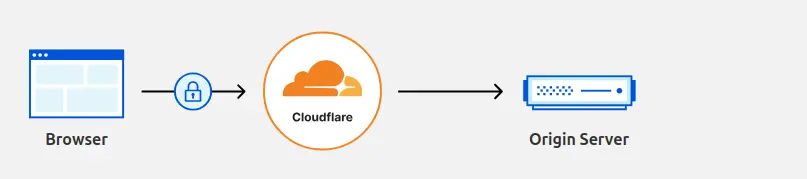
A lot of good things… if they are carefully configured and you know what you’re doing. Even the caching can be super annoying when you don’t understand why your CSS or images aren’t updated on your app, because you forgot about Cloudflare.
Let’s leave it to advanced users, and make our way first WITHOUT the Cloudflare proxy. This is my configuration:

What happens now if I type https://app.datachamp.eu in my address bar?
Nothing.
When using https, it is a shortcut for asking the port 443. And http is for port 80.
Do we have a service that listens on port 443 or 80 on our server?
Nope. We only have Shiny Server that listens on port 3838.
Enter… nginx!
Install nginx
Our goal is the following:
- HTTP to HTTPS redirection: If a request comes in on port 80 (HTTP), then we redirect the client to port 443 (HTTPS), so that the traffic gets encrypted.
- Forwarding the request to the Shiny Server: If a request comes in port 443 (HTTPS), nginx runs its magic to encrypt the traffic with TLS certificates, and forwards the request to the Shiny Server.
nginx can do plenty of other things, but that will be a lot already.
Go back to the terminal of your VM with your user that has admin privileges. Let’s start with installing nginx:
sudo apt install nginxOnce again, the version that you will get from Debian lags a bit behind. If I type sudo nginx -v, I see that it comes with version 1.22.1, while the latest stable version of nginx is 1.28.0.
But: This is fine. You don’t need the latest cutting edge version. Also note that you shouldn’t worry about security updates. These are still shipped by Debian. That’s why the version number is actually 1.22.1-9+deb12u2:
1.22.1is the nginx version-9means this is the 9th revision of 1.22.1 from Debian maintainers+deb12u2means it is for Debian 12, and that’s the 2nd update (u2) for this release
The latter symbols will change over time, but Debian will always keep the 1.22.1 fixed over the lifetime of a major release. Again, when Debian 13 is released, it will come with a more advanced nginx version.
Now that nginx is installed, can you try your domain name again with HTTP? So http://app.datachamp.eu/ for me. Here is what I see:
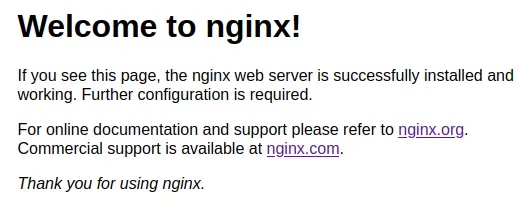
Awesome! nginx is showing you some default page.
Our turn now to replace this with our Shiny app.
Configure nginx
Let’s start with removing the default configuration (it’s crazy how you have to always clean it up right after installing new software):
sudo rm /etc/nginx/sites-enabled/default
sudo rm /etc/nginx/sites-available/default
sudo rm -R /var/www/html
The default configuration file is in /etc/nginx/nginx.conf. I will erase it with my own version:
user www-data;
worker_processes auto;
pid /run/nginx.pid;
include /etc/nginx/modules-enabled/*.conf;

events {
    worker_connections 1024;
}

http {

    map $http_upgrade $connection_upgrade {
        default upgrade;
        '' close;
    }

    ######
    ## Basic Settings
    ######

    tcp_nodelay on;
    types_hash_max_size 2048;
    server_tokens off;

    server_names_hash_bucket_size 64;

    include /etc/nginx/mime.types;
    default_type application/octet-stream;

    ######
    ## Buffers & Timeouts
    ######

    # Buffer size for POST submissions
    client_body_buffer_size 10K;
    client_max_body_size 8m;
    # Buffer size for Headers
    client_header_buffer_size 1k;
    # Max time to receive client headers/body
    client_body_timeout 12;
    client_header_timeout 12;
    # Max time to keep a connection open for
    keepalive_timeout 15;
    # Max time for the client to accept/receive a response
    send_timeout 10;
    # Skip buffering for static files
    sendfile on;
    # Optimise sendfile packets
    tcp_nopush on;

    ######
    ## Add headers
    ######

    add_header X-XSS-Protection "1; mode=block";
    add_header Content-Security-Policy "frame-ancestors 'self'";
    add_header X-Content-Type-Options nosniff;
    add_header Referrer-Policy "no-referrer";
    add_header Permissions-Policy "geolocation=(); midi=(); notifications=(); push=(); microphone=(); camera=(); magnetometer=(); gyroscope=(); speaker self; vibrate=(); fullscreen self; payment=();";

    ######
    ## SSL Settings
    ######

    include snippets/ssl-params.conf;

    ######
    ## Logging Settings
    ######

    access_log /var/log/nginx/access.log;
    error_log /var/log/nginx/error.log;

    ######
    ## Gzip Settings
    ######

    gzip on;
    gzip_disable "msie6";
    gzip_comp_level 4;
    gzip_min_length 1000;
    gzip_proxied expired no-cache no-store private auth;
    gzip_types text/plain;
    gzip_types text/css;
    gzip_types text/js;
    gzip_types text/xml;
    gzip_types text/javascript;
    gzip_types application/javascript;
    gzip_types application/x-javascript;
    gzip_types application/json;
    gzip_types application/xml;
    gzip_types application/rss+xml;
    gzip_types image/svg+xml;

    ######
    ## Virtual Host Configs
    ######

    include /etc/nginx/sites-enabled/*;
}
This is the default nginx configuration file I use for all my projects. You could use the one that is provided by nginx, but this one provides substantial improvements. Let me summarize the main points:
It uses the www-data user. This is similar to Shiny Server having the shiny user. We keep the same principle: Never use root and prefer users without admin privileges to run services.
It configures security headers. These are pieces of information that are added to the response requests to instruct your browser to enforce some security rules, reducing the risk of standard web attacks.
It hides nginx version. This is useful when a security vulnerability is known on a specific version of nginx. Better not to shout “I HAVE THE BUGGED VERSION PLEASE HACK ME”, even though hiding the information is not a sufficient protection (run your updates on a regular basis).
All that text should be entered in /etc/nginx/nginx.conf. You can remove the previous file, recreate it with sudo nano /etc/nginx/nginx.conf and copy/paste the content.
This is not enough, because this configuration file calls two other files.
The first is /etc/nginx/dhparams.pem, which you can create by running this command:
sudo openssl dhparam -out /etc/nginx/dhparam.pem 4096Your terminal will now shows a succession of dots . and pluses + and asterisks *. I’m not sure why, but it’s basically generating prime numbers for some fancy encryption algorithm.
The second file is /etc/nginx/snippets/ssl-params.conf. Here is the content you can put inside of it:
# certs sent to the client in SERVER HELLO are concatenated in ssl_certificate
ssl_session_timeout 1d;
ssl_session_cache shared:MozSSL:10m;
ssl_session_tickets off;
# Diffie-Hellman parameter for DHE ciphersuites, recommended 2048 bits
ssl_dhparam /etc/nginx/dhparam.pem;
# intermediate configuration. tweak to your needs.
ssl_protocols TLSv1.2 TLSv1.3;
ssl_ciphers ECDHE-ECDSA-AES128-GCM-SHA256:ECDHE-RSA-AES128-GCM-SHA256:ECDHE-ECDSA-AES256-GCM-SHA384:ECDHE-RSA-AES256-GCM-SHA384:ECDHE-ECDSA-CHACHA20-POLY1305:ECDHE-RSA-CHACHA20-POLY1305;
ssl_prefer_server_ciphers on;
ssl_ecdh_curve X25519:prime256v1;
# HSTS (ngx_http_headers_module is required) (31536000 seconds = 1 year)
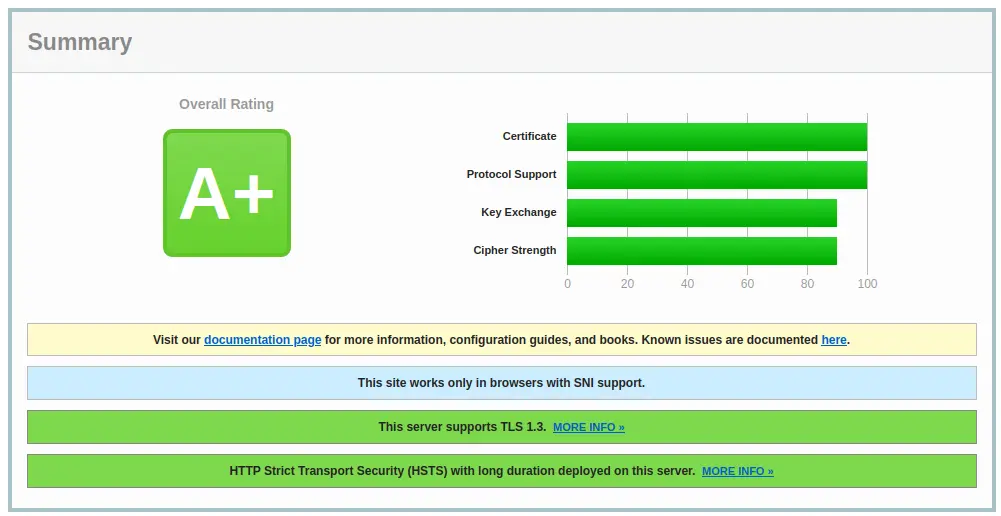
add_header Strict-Transport-Security "max-age=31536000; includeSubDomains; preload" always;I’ll be honest, I don’t understand everything this is doing. I just know:
- it enforces strong encryption
- it removes legacy protocols
- it removes weak ciphers
- it forces browsers to use HTTPS instead of HTTP
After we are done, you can check your SSL/TLS configuration on https://www.ssllabs.com/ssltest/. You should expect an A Rating, nothing less.
But we are not done yet. We haven’t even applied the new configuration.
Generate the SSL/TLS certificates
The SSL/TLS certificates are essential for two purposes:
- Encrypting the traffic between your users and the server
- Offering users a guarantee that you are who you claim to be
The first part is easy to understand. The certificate acts as a pair of cryptographic keys which is used to encrypt all the communication.
The second part is trickier.
When you send a request to a server, how can you make sure that this is the correct server that’s responding to you? Your request went around the entire world through the internet, going from one router to the next.
What if at some point a router decided to impersonate the server you’re trying to reach and responded directly to you?
That’s called a Man-in-the-middle attack.
To prevent that, there are independent and trustworthy third parties that issue certificates that servers can use to certify that they are who they claim to be.
And that rogue router? It will not have the certificate, so your browser will detect the attack automatically.
How do you get your certificates?
Fortunately, you don’t have to go through the hassle of requesting it from an institution and wait for days. For many years now there have been a great free tool named certbot.
The website provide clear instructions on the home page. You simply choose your Software and System:

Simply follow the instructions and you will have your certificates in no time:
# First, you need to install snapd
sudo apt update
sudo apt install snapd
sudo snap install snapd

# Then, you can install certbot
sudo snap install --classic certbot
sudo ln -s /snap/bin/certbot /usr/bin/certbot
Finally, you can request your certificate. Use the certonly option, otherwise certbot will mess up your nginx configuration:
sudo certbot certonly --nginx -d app.datachamp.euIf this step fails, it probably means you haven’t configured your DNS servers properly. If successful, you should see something similar to this:
Successfully received certificate.
Certificate is saved at: /etc/letsencrypt/live/app.datachamp.eu/fullchain.pem
Key is saved at:         /etc/letsencrypt/live/app.datachamp.eu/privkey.pem
This certificate expires on 2025-09-14.
These files will be updated when the certificate renews.
Certbot has set up a scheduled task to automatically renew this certificate in the background.
Wait…
The certificate will expire on September 14?
And then what?
Don’t worry. One of the biggest benefit of certbot is that it will renew your certificates automatically. Basically, now that you’ve done this step, you never have to worry about it again.
Take note of the path to the certificate and the key, because we will use them in the next step.
Forward the request to the Shiny Server
We are FINALLY ready!
That nginx stuff is not easy.
We need to create a final configuration file, specific for Shiny this time.
Run sudo nano /etc/nginx/sites-available/shiny.conf and copy/paste the following file:
server {
    listen 80;
    listen [::]:80;
    server_name app.datachamp.eu;
    return 301 https://$host$request_uri;
}

server {
    listen 443 ssl http2;
    listen [::]:443 ssl http2;
    server_name app.datachamp.eu;

    location / {
        proxy_pass http://localhost:3838;
        proxy_redirect / $scheme://$http_host/;
        proxy_http_version 1.1;
        proxy_set_header Upgrade $http_upgrade;
        proxy_set_header Connection $connection_upgrade;
        proxy_read_timeout 20d;
        proxy_buffering off;
    }

    ssl_certificate /etc/letsencrypt/live/app.datachamp.eu/fullchain.pem;
    ssl_certificate_key /etc/letsencrypt/live/app.datachamp.eu/privkey.pem;
}
There are a few changes you need to make:
- For both
server_nameinstructions, change the domain name for yours. - At the end of the file, change the paths to your certificates. In effect, that’s also about replacing the domain name for yours.
What does this file do?
It redirects from HTTP to HTTPS. That’s the purpose of the first block. It listens on port 80 (HTTP) and redirects (301) to the same address starting with https
It redirects from HTTPS to localhost:3838. That’s the second block. Whenever a request comes in from HTTPS, the request gets forwarded internally to the Shiny Server, which listens on localhost:3838.
It serves the SSL/TLS certificates. These are the last two lines. That’s how you encrypt the traffic and get this nice lock icon from your browser.
Shall we test our configuration?
First, activate the configuration with the following command:
sudo ln -s /etc/nginx/sites-available/shiny.conf /etc/nginx/sites-enabled/shiny.confAnd check if the configuration is correct:
sudo nginx -tIt should let you know that the syntax is ok:
nginx: the configuration file /etc/nginx/nginx.conf syntax is ok
nginx: configuration file /etc/nginx/nginx.conf test is successful
If there is a syntax problem, nginx will let you know exactly where, so that you can fix it.
Otherwise… you only need to apply the nginx configuration:
sudo systemctl restart nginxAND YOU’RE DONE!
Congratulations!
You can now visit the app on https://app.datachamp.eu.

Ah. Oops.
Last tip: When you visit the page at your root domain (so app.datachamp.eu for me), it will serve what it finds in the /srv/shiny-server repository.
Previously, when we cloned the repository, it created /srv/shiny-server/shiny-tiny-hackathon. So the app is available at: https://app.datachamp.eu/shiny-tiny-hackathon.
Finally:
That’s it.
You’re done.
The 7 Habits of Highly Effective Servers
Before you leave.
1. Update your servers at least once a month. If you’re using unattended-upgrades, you won’t have much to do, but come by once in a while to check everything is in order. And reboot after Linux kernel upgrades.
2. Backup your production server. You never know what could happen. You might lock yourself out. Or delete everything. Or get hacked. If the server is particularly important to you, rely on backups that are not hosted on the same provider.
3. Learn how to manage a server. Learn basics with bash, vim, nginx configuration. Everything we covered today, but with more depth. Experiment.
4. Set up monitoring & alerts. Know when your server goes bad. You can use node-exporter + Prometheus + Grafana. Or third party services such as Netdata.cloud.
5. Rotate passwords and SSH keys. Especially if you have collaborators, and they come and go. I rotate my passwords and SSH keys every year. Oh, and don’t use the same SSH key everywhere (same goes for passwords).
6. Learn CI/CD to deploy your code automatically. You’ve done it once. Now you can update your app easily with git pull and restarting the Shiny Server sudo systemctl restart shiny-server. Tomorrow you won’t even have to do that thanks to an automated deployment pipeline.
7. Learn Ansible to deploy new apps automatically. At Data Champ’ we rarely deploy servers manually anymore. More and more we’re using automation to speed things up and reduce errors. Ansible can run all the steps from this guide automatically for you.
Follow these seven habits and your $5-per-month VM will remain fast, secure, and reliable.
Appendix
AWS is expensive
Very expensive.
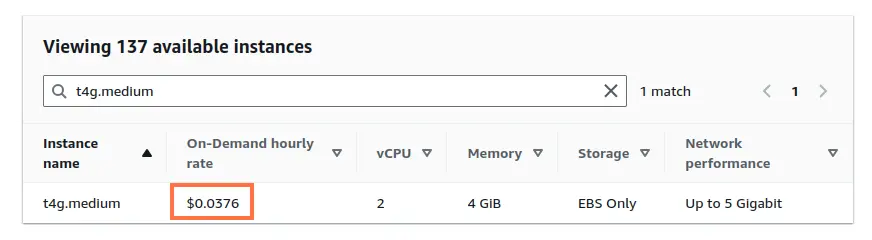
Let’s say you need a machine with 4 GB of RAM, which is fairly common for a Shiny app.
You could take a t4g.medium EC2 instance for $27 a month (link for pricing).
Or a Lightsail VPS for $24 a month (link for pricing).
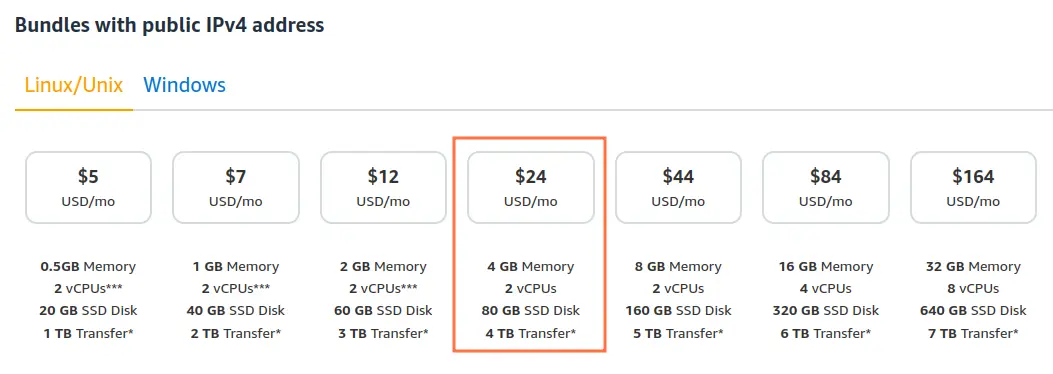
A similar machine on Hetzner would cost you $4.59 a month (link for pricing).
What do you think justify a FIVE TIMES increase in price?
A better CPU?
Not really according to vpsbenchmarks.com.
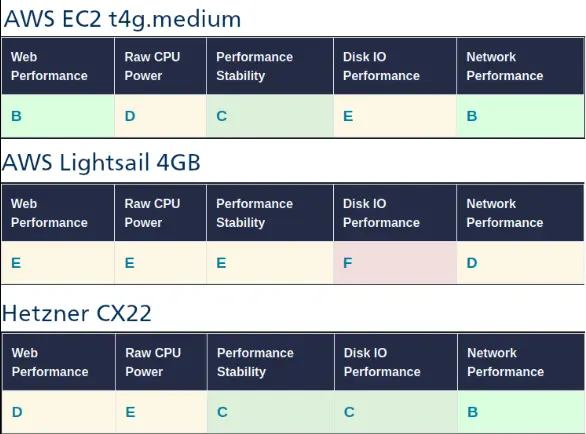
Source links: EC2, Lightsail, and Hetzner.
The EC2 proposition is only slightly better than Hetzner’s.
You could still use a different Hetzner offer and get a much better CPU than AWS… still at three times less the same price.
Even an IPv4 address costs 3.6$ per month at AWS, and only 0.6$ at Hetzner.
I will say it again: AWS is expensive.
AWS is complicated
An objection I often hear goes like this: “Sure, AWS is expensive, but it’s fully managed, so you save on ops.”
Really?
Then why do you need to hire an AWS expert?
An AWS expert who costs twice as much as the server guy you were working with before.
AWS is not fully managed.
Here is the reality: You just swapped the pain of running Linux with the pain of running AWS.
The interface is a labyrinth. The docs read like legal documents. And now people can build entire careers based only on understanding AWS. Amazon even delivers certifications at multiple levels for this.
So, why the fuck?
It’s more complicated, and it’s more expensive.
So why are people using it?
Some companies are using it for the right reasons. Think about why AWS was created in the first place.
It was created to manage Amazon-scale chaos:
- Millions of visitors every day
- Thousands of micro services
- Global sale days where traffic increase tenfolds or even more
That kind of scale makes it worth it to use a public cloud like AWS.
But for your Shiny dashboard?
That only your internal team is using?
Even if your app gets thousands of visitors a day…
AWS is overkill for Shiny.
Comments